Wednesday, June 28, 2023

What Is the Process for Publishing an App on Google Play Store?

 Publishing an app on Google Play Store represents a significant step for developers to share their digital solutions with an extensive global audience. This process, although meticulously detailed, is achievable and can be a momentous achievement in the software development life cycle. It involves various stages including developing an app, preparing for its release, releasing it, and subsequently managing and tracking its performance. To ensure that this process is navigated smoothly, developers need to comply with Google’s policies and procedures, involving everything from submission and approval to monetization and performance optimization.

This article aims to offer a comprehensive guide on the process for publishing an app on the Google Play Store, detailing all necessary steps and providing key insights to enhance your understanding and execution of this critical process.


Process for Publishing an App on the Google Play Store

This article aims to offer a comprehensive guide on the process for publishing an app on the Google Play Store, detailing all necessary steps and providing key insights to enhance your understanding and execution of this critical process.

The following is the process for publishing an app on the google play store:

1. Create a Google Developer Account

Creating a Google Developer account, akin to getting your ticket for this exciting ride, is an essential part of this journey.

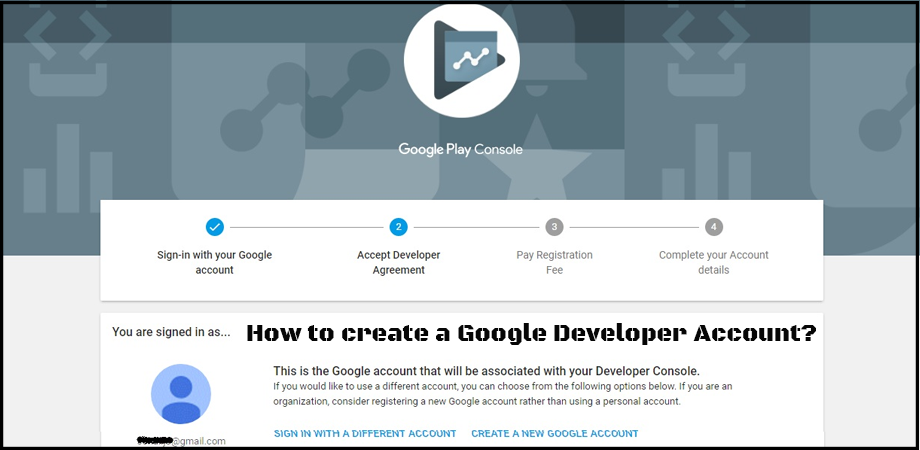
Taking your first step into the world of app publishing can be as thrilling as stepping onto a roller coaster for the first time. Creating a Google Developer account, akin to getting your ticket for this exciting ride, is an essential part of this journey.

Think of it this way – imagine you’re an artist, and you’ve just finished your masterpiece painting. Now, you’re eager to showcase your work at a grand exhibition where thousands of people can admire and appreciate it. Your Google Developer account is like that exhibition space – it’s the platform where you can display your digital art (the app) to millions of people worldwide.

So, how does one create this account? Well, it’s as simple as preparing your favorite recipe.

Here are the steps:

A. First, go to the Google Play Console website, which is like the kitchen where you’ll prepare your dish.

B. Then, click on ‘Sign Up’, similar to how you would gather your ingredients. Here, you’ll need to use a Google account. If you don’t have one, it’s like running out of flour – you’ll have to go and get it, which means creating a new Google account.

C. Now, you agree to the Developer Agreement. This is a bit like following the recipe’s instructions – you have to agree to them to ensure your dish turns out right!

D. Next is the payment of a one-time $25 registration fee, a bit like purchasing a cooking tool you’ll need to prepare your recipe.

E. Lastly, you’ll complete your account details – your ‘Contact Information’ and ‘Merchant Profile’. Think of this as setting the table before serving your dish.

After you’ve finished these steps, you’ve got your Google Developer account ready to go – your exhibition space is set up and ready to showcase your app masterpiece to the world!


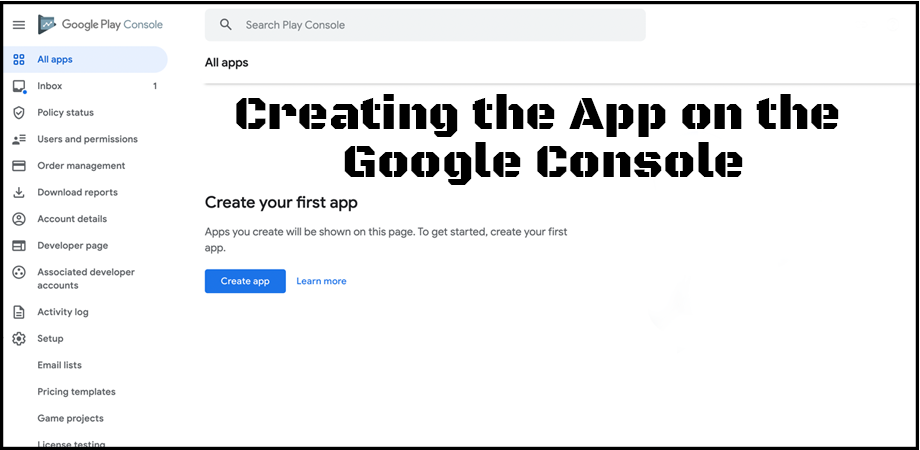
2. Creating the App on the Google Console

Creating the App on the Google Console

Imagine you’ve just completed the exciting process of app development and built the most incredible digital treehouse. It’s equipped with everything you’ve ever wanted – a secret door, a rope ladder, and even a cool telescope to stargaze at night. Now, it’s time to share this exciting hideaway with your friends. This is what it feels like when you’re ready to upload your app to the Google Play Console. The app you’ve built, much like your treehouse, is a result of your creativity and hard work, and now it’s time to invite others to see and appreciate it.

Google Play Console is like the special invitation card you send out to your friends. Creating your app on it is how you announce to the world about your exciting new treehouse (your app).

Here’s how to do it:

A. First, sign in to your Google Play Console, just like stepping into your post office to send out the invitations.

B. Now, click on ‘Create Application’, as if you’re picking out the perfect invitation card design. Here, you choose the language and write down the title of your app. It’s like writing down the name of your treehouse on the card.

C. Then, fill out the ‘Product Details’: your app’s short and long descriptions, and screenshots. This is like telling your friends about all the fun things in your treehouse – the secret door, the rope ladder, and the telescope. You want them to be excited about it!

D. Set up the ‘Content Rating’. This is like telling your friends if the treehouse is suitable for them. A treehouse with a tricky rope ladder might not be suitable for very young friends, right?

E. Determine the ‘App Release’. This is deciding when to invite your friends over. Do you want them all to come at once, or do you want to invite them in small groups?

F. Finally, set up the ‘Pricing & Distribution’ and ‘Store Listing’, just like writing down your treehouse’s location and when it’s open for visits.

Once all these are done, congratulations! Your app, your digital treehouse, is now ready for the world to see and admire. Remember, just as every bolt and board in your treehouse was placed with intention, each detail you provide in the Google Play Console helps people understand and love your app. Now, take a deep breath, hit publish, and watch as your creation brings joy to others, one download at a time.


3. Store Listing

Crafting your Store Listing is like setting up an adventure for your users. The goal is not just to get them to download the app, but to make sure they're excited to open it again and again.

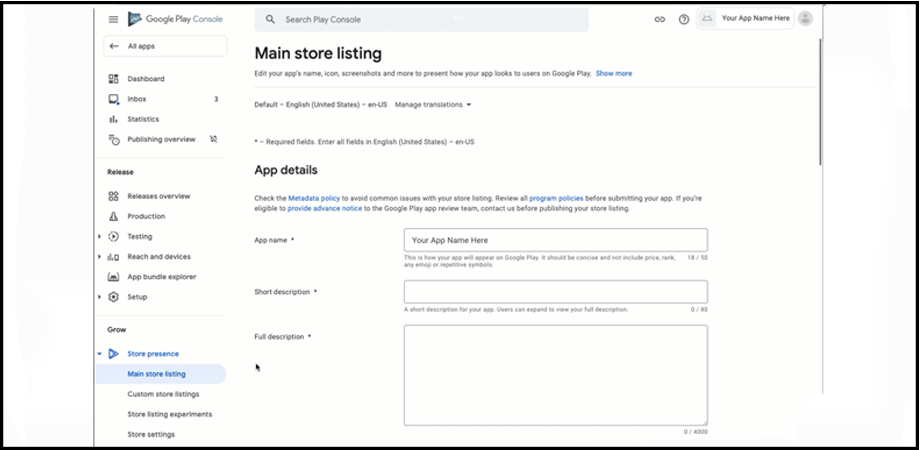
Imagine you’ve organized an exciting treasure hunt and your friends are eager to participate. You’ve carefully hidden clues and rewards, each more thrilling than the last. But how will your friends embark on this adventure if they don’t have a map? In the world of app publishing, Store Listing is that treasure map. It’s your way of guiding users to discover and appreciate all the cool features of your app—the treasures you’ve so thoughtfully incorporated.

So, what makes a compelling treasure map— or in our case, a Store Listing?

Let’s break it down:

A. Title: Just like the name of your treasure hunt, your app’s title is the first thing people will see. Make sure it’s catchy and gives a clue about what the app does. For example, if your app is a game where users can grow their virtual garden, a title like “Bloom Bliss: Your Pocket Garden” would be appealing.

B. Short Description: This is like a sneak peek of the thrilling adventure you’ve prepared. A quick line that excites users and prompts them to know more. For our imaginary gardening game, it could be “Turn your screen green, and let your virtual garden dream come true!”

C. Full Description: This is the main part of the treasure map—the path leading to the grand prize. Here, you can elaborate on what your app does, its features, and why users should download it. For instance, you could talk about different plants they can grow, rewards they can earn, and how the game can help them unwind.

D. Screenshots, Videos, and Graphics: These are like pictures of the treasure and the exciting spots along the hunt. A picture speaks a thousand words, so screenshots of your app in action or a quick video tour can significantly enhance your listing.

E. App Category: This is like telling your friends if the treasure hunt is in a park, a beach, or a castle—it sets the scene. Whether your app is a game, a fitness tool, or an educational resource, this will help users find it.

F. Contact Details: This is where you, the organizer of the treasure hunt, provide ways for participants to reach you if they have questions or need help. It’s a good practice to provide an email address where you can be reached.

Crafting your Store Listing is like setting up an adventure for your users. The goal is not just to get them to download the app, but to make sure they’re excited to open it again and again. And when you see those download numbers ticking up, it’s the same feeling as watching your friends’ faces light up as they embark on your treasure hunt!


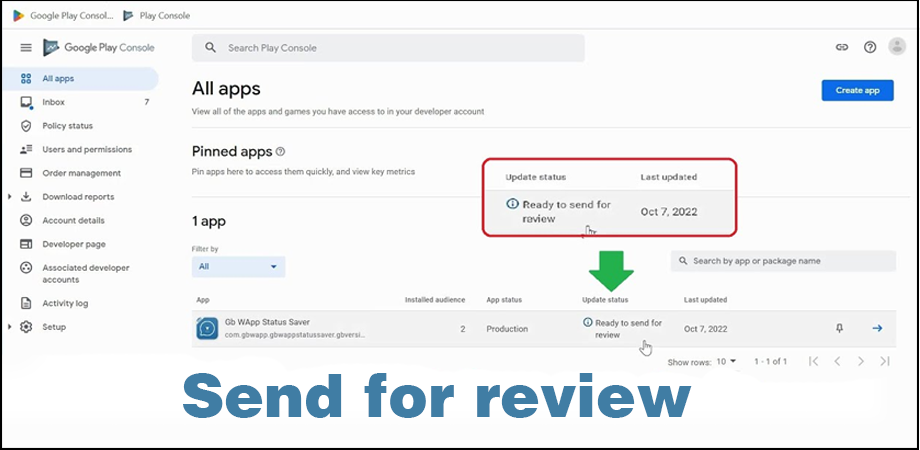
4. Upload APK and Send it for Review

Uploading APK And sending it for review is a pivotal part of your journey as an app developer, the moment when your hard work meets the world's stage.

Picture yourself as a brilliant magician who’s finally ready to reveal their dazzling new trick to the world. You’ve practiced it countless times in front of your mirror, ironed out all the kinks, and now the time has come to step onto the stage. Uploading the APK of your app and sending it for review is akin to that big moment under the spotlight.

An APK, which stands for Android Package Kit, is like the magic box that holds your trick. It contains all the elements of your app, like the design, features, and functionality, bundled up neatly. When you upload your APK to Google Play Console, it’s like revealing your magic box to the world, but the trick’s not done yet.

Here’s how it goes:

A. Upload the APK: On the Google Play Console, there’s an option to ‘Upload APK.’ That’s where you present your magic box. You’ll choose the file from your computer, and in a few moments, it’s up on the stage.

B. Set Up the Review Process: Now, it’s time to ask Google to inspect your magic trick. You’ll find this in the ‘App Releases’ section where you can select ‘Review.’ This is you saying, “Go ahead, Google. Check out my trick.”

C. Wait for the Review: Just like the gasps and whispers of an audience waiting for the outcome of a magic trick, there’s anticipation while Google reviews your app. It can take up to 7 days or more, so while it’s normal to feel a bit nervous, remember – even the greatest magicians had to wait for their applause.

D. Handle the Outcome: If Google finds that your app follows all the rules, congratulations! Your trick is a success, and your app is ready to be published. But if there are any issues, don’t worry. Google will give you feedback, and you can fix them. Just like a magician who might need to tweak their trick before the grand reveal.

And there you have it! You’ve completed the big moment – the APK upload and review. It’s a pivotal part of your journey as an app developer, the moment when your hard work meets the world’s stage. So take a deep breath, click ‘Upload’, and remember – every great show has a thrilling climax, and this could be yours!
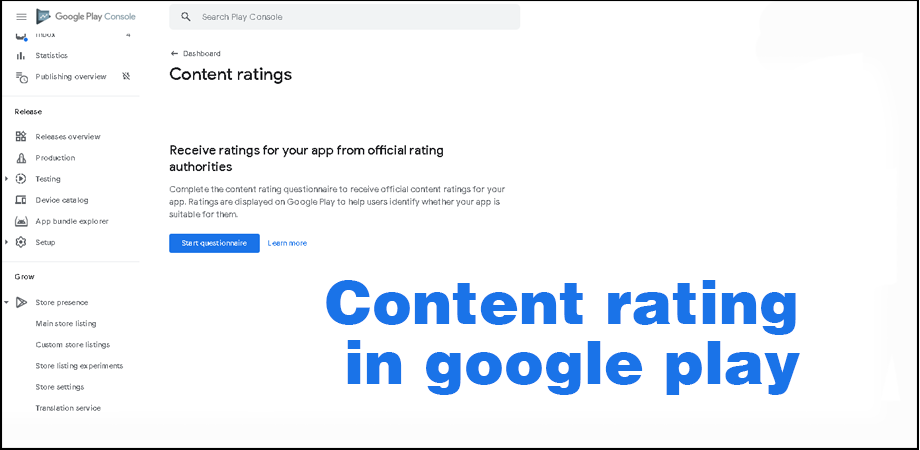
5. Content Rating

The content rating is like a movie genre label - it helps people understand if your app is the right 'fit' for them. It informs users about the suitable age group and any sensitive content present in your app.

Imagine you’re organizing a movie night for your friends. You’ve got the popcorn ready and the room set up just right. But when you choose the movie, you have to consider who’s watching. A spooky horror film might be great for your thrill-seeking friends, but not for those who prefer a light-hearted comedy or a fun animation. Similarly, when you’re publishing your app on Google Play Store, setting the right content rating is essential.

The content rating is like a movie genre label – it helps people understand if your app is the right ‘fit’ for them. It informs users about the suitable age group and any sensitive content present in your app. In the same way, you wouldn’t want your younger sibling to accidentally watch a scary movie; you wouldn’t want kids stumbling upon an app that’s not age-appropriate.

Here’s how you can set the content rating for your app:

A. Questionnaire: Google Play Console will present you with a questionnaire, much like a movie survey asking about the film’s elements. It’s important to answer these questions accurately, taking into account all the features and content of your app. It’s like making sure you remember all the scenes in the movie before deciding who it’s suitable for.

B. Review and Apply: Once you’ve completed the questionnaire, Google will suggest a rating. It’s like a movie rating popping up based on your survey answers. You’ll then apply this rating to your app.

C. Wait for Approval: Like waiting for your friends’ thumbs-up on the movie choice, Google will review your rating application. If everything checks out, your rating will be approved.

D. Make Necessary Adjustments: If Google suggests that your app’s content is not suitable for a particular age group, you might need to make adjustments. It’s like editing the scary scenes out of a movie if you want it to be kid-friendly.

Assigning the right content rating for your app is an essential step in the publishing process. It ensures that your app reaches the right audience – those who will enjoy and appreciate it the most. So, just like carefully picking the right movie for movie night, take your time to understand and set your app’s content rating. It might seem like a small detail, but it can significantly impact how well your app is received and who ends up using it!


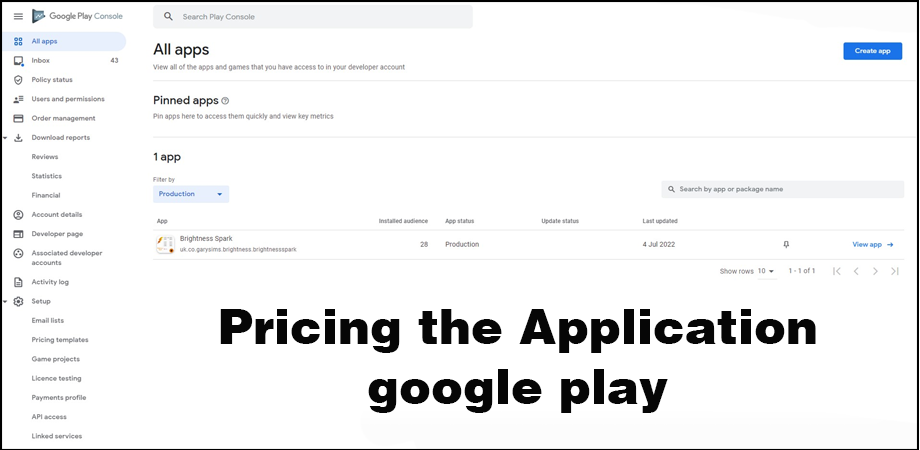
6. Pricing the Application

Pricing your application is a strategic process, requiring you to balance your investment and what users are willing to pay. It's about recognizing the value of your creation and communicating that to your users.

Picture this: you’ve spent weeks, maybe even months, building a spectacular sandcastle on the beach. It’s intricate, with high walls, elegant towers, and even a tiny moat around it. Now, imagine if you could charge a small fee for people to marvel at your creation, the money going towards maintaining the castle or perhaps building more impressive ones in the future. Deciding on a price for this viewing experience is much like pricing your application on the Google Play Store.

When you price your application, you’re essentially putting a value on your digital sandcastle. You’ve invested time and effort into creating it, and if people find it valuable, they might be willing to pay for it. But setting this price isn’t as simple as pulling a random number out of a hat.

Here’s how you might go about it:

A. Research: Firstly, you need to understand your audience. Who will be interested in your sandcastle, or in this case, your app? What are similar apps priced at? Like finding out how much people typically pay to see sandcastles, understanding the market can help you set a fair price.

B. Value Determination: Next, consider the value your app provides. If your sandcastle lights up at night or if your app offers unique features that others don’t, you might charge a little more. But remember, the price should still reflect what your audience can afford and is willing to pay.

C. Choose the Pricing: After considering these factors, you can set a price. On the Google Play Console, you’d go to the ‘Pricing & Distribution’ section and enter your chosen price.

D. In-App Purchases or Ads: Sometimes, you might want to offer your app for free but have other ways to generate income. It’s like letting everyone see your sandcastle for free, but if they want a guided tour or a picture with it, they’d have to pay a small fee. In the app world, these are like in-app purchases or ads.

E. Switching Between Free and Paid: Google Play allows you to change your app from paid to free. However, once your app is free, you cannot make it paid again. This is like allowing free entry to your sandcastle once, but if you decide to charge again later, those who got in for free should always have free entry.

Pricing your application is a strategic process, requiring you to balance your cost of making your app and what users are willing to pay. It’s about recognizing the value of your creation and communicating that to your users. Just as every grain of sand contributes to the sandcastle, every feature of your app adds to its value. And with the right price, your app can be appreciated by many, all while supporting your passion for creating more digital ‘sandcastles’!


7. Link Your Merchant Account

Linking a merchant account is like setting up your cash box. It's where all the earnings from your app will be collected, be it from users buying your app, making in-app purchases, or generating ad revenue.

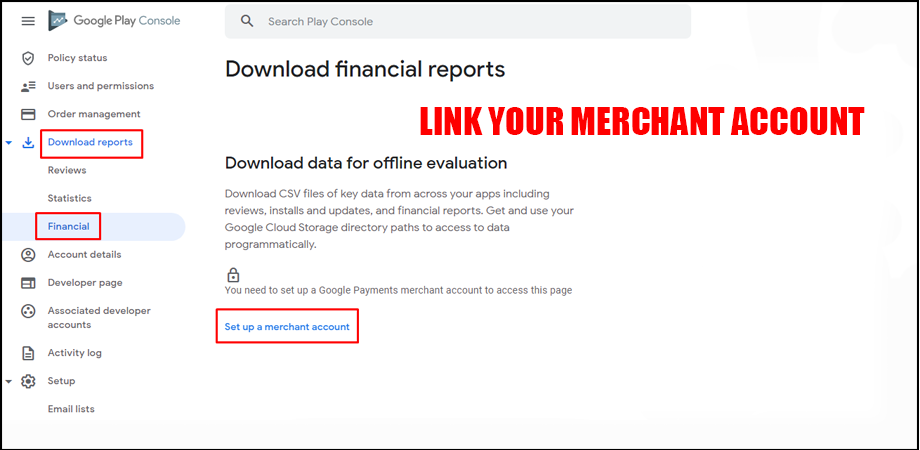
Picture this: You’ve set up a lemonade stand. It’s a hot day, and people passing by are thrilled to see your stand. They enjoy your refreshing lemonade and are ready to pay. But here’s the catch – you’ve got no cash box to collect the money. This is where linking your merchant account while publishing an app on the Google Play Store comes into the picture.

Linking a merchant account is like setting up your cash box. It’s where all the earnings from your app will be collected, be it from users buying your app, making in-app purchases, or generating ad revenue.

Here’s how you do it:

A. Create a Payments Profile: First, you’ll need a Google Payments Profile, which is like your personal identifier on the Google payment platform. It holds essential details like your name, address, and bank account information. This profile is crucial as it’s where all your transactions will be recorded – kind of like keeping a tally of all the lemonades you’ve sold.

B. Set Up a Merchant Account: Once your Payments Profile is ready, you can set up a merchant account on Google Play Console. It’s similar to setting up your lemonade stand and displaying a sign saying “Lemonade for Sale”. This account is where you’ll manage all your app sales and view your financial reports – a dedicated spot to oversee your business.

C. Link Your Merchant Account: Now, it’s time to connect your cash box to your lemonade stand, or in other words, link your merchant account to your app. In the Google Play Console, you’ll find the option to do this in the ‘Monetization setup’ section under ‘Monetize’. Once you’ve linked the account, you’re all set to start receiving payments from your app.

Just like setting up a cash box makes it possible for you to earn from your lemonade stand, linking a merchant account allows you to earn from your app. It’s an exciting step – you’ve built something people value, and now you’re ready to see the fruits of your labor. But remember, just like the joy of making lemonade isn’t just in the money earned but also in the smiles of people who enjoy it, building an app isn’t just about earning. It’s about the joy of creating something that people appreciate and find useful, making all your hard work worth it!


8. App Name and Icon

Your app's name and icon are like the title and cover of your book. They're the first things people notice when browsing the app store, just like a book's title and cover can catch a reader's eye in a bookstore. They create the first impression and can spark curiosity, excitement, and interest.

Let’s imagine that you’ve written a fantastic book. It has a gripping storyline, interesting characters, and everything else that makes for a great read. But what would you call this book? And what image would you choose for the cover? This is quite like naming your app and choosing its icon when publishing on the Google Play Store.

Your app’s name and icon are like the title and cover of your book. They’re the first things people notice when browsing the app store, just like a book’s title and cover can catch a reader’s eye in a bookstore. They create the first impression and can spark curiosity, excitement, and interest.

Here’s how you go about it:

A. App Name: Just like you’d want your book title to be catchy and intriguing, your app’s name should also be attractive and relevant to what your app does. For instance, if your app is a weather forecasting app, you might choose a name like ‘Sunshine’ or ‘Weather Wizard’. It’s important to remember that the app name should not exceed 50 characters, as per Google Play Store guidelines.

B. App Icon: Choosing an app icon is like picking a book cover. It needs to be visually appealing and give an idea of what your app is about. An icon with a sun and a cloud could be an excellent fit for your weather app. The icon needs to be a 512 x 512 pixels image in PNG format.

Creating your app’s name and icon is a mix of creativity and strategy. You want it to stand out in the crowd, much like your book in a bookstore, but it also needs to reflect your app’s essence. Just like the thrill of seeing your book with its name and cover for the first time, seeing your app with its name and icon is equally exciting. It gives identity to your hard work and creativity and is the first step in introducing your app to the world. So, be creative, be strategic, and most importantly, have fun in the process!


9. Provide an Appropriate Content Rating

A content rating in the app world is like a movie's age rating. It guides users (and their parents) to determine if an app is suitable for them.

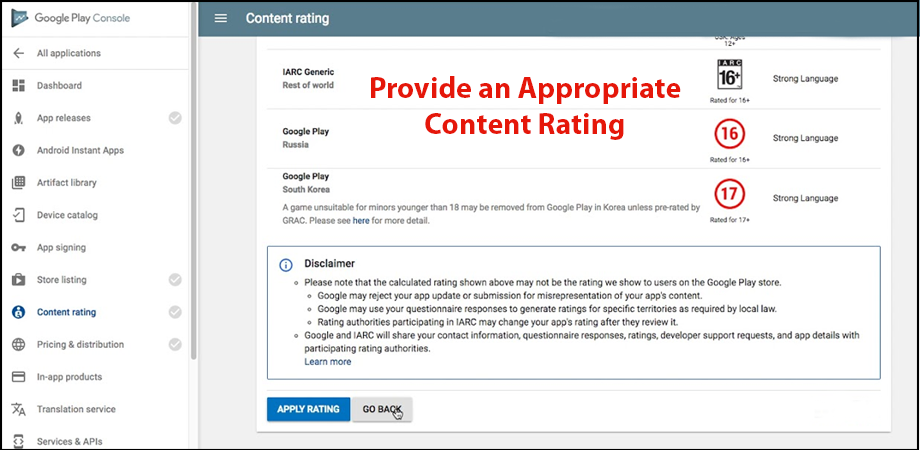
Imagine you’re the host of a movie night at your house. You’ve invited friends of all ages – some are your age, some are much older, and some are your little siblings and their friends. Would you pick the same movie for everyone? Probably not. The movie that’s appropriate for your friends might not be suitable for your little siblings. This is much like providing an appropriate content rating for your app on the Google Play Store.

A content rating in the app world is like a movie’s age rating. It guides users (and their parents) to determine if an app is suitable for them. Whether an app is like a G-rated movie for everyone or a PG-13 one for slightly older kids depends on its content.

Here’s how you determine this:

A. Analyze Your App: The first step is to understand your app thoroughly. Is it an educational app suitable for all ages, or does it contain content that’s only appropriate for adults? This is like figuring out whether your movie is a fun animated film or a thrilling action movie.

B. Fill Out the Content Rating Questionnaire: Google Play Store provides a content rating questionnaire that helps you rate your app. It asks about things like the presence of violence, sensitive themes, or user-generated content in your app. It’s like having a list of questions to help you decide which movie is suitable for your movie night attendees.

C. Review and Apply the Rating: Once you’ve filled out the questionnaire, Google Play Store will provide a content rating for your app. This rating will be visible to users when they view your app on the Play Store. This is like deciding that the animated film is suitable for your little siblings, while the thrilling action movie is for your older friends.

Providing an appropriate content rating is a responsible and critical step in publishing an app. It’s about ensuring the right audience finds your app and has a positive experience using it. Just like picking the right movie ensures everyone has a fun movie night, the right content rating ensures that users (and their parents) can trust your app and enjoy using it. It’s like being a thoughtful host but for your app!


10. Set Up Pricing & Distribution

Setting up pricing and distribution is an exciting phase in publishing an app. It's when you decide the value of your app and who can benefit from it.

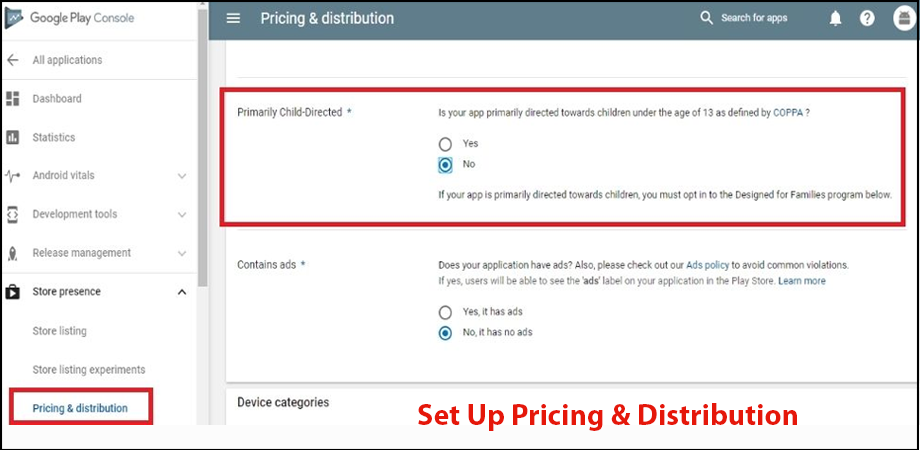
Imagine you’re planning a big garage sale. You’ve got a variety of items – from old comic books to a bicycle you no longer use. Now, you need to set prices for each item and decide who can come to your sale. Is it just your neighbors or people from other towns too? This process is quite similar to setting up pricing and distribution for your app on the Google Play Store.

Setting up pricing is like labeling your garage sale items. You need to decide whether your app will be free or paid. If it’s paid, how much should it cost? Should there be in-app purchases or subscriptions? These decisions should consider the value your app provides, much like how the price for your barely-used bicycle would be higher than the old comic books.

Next is distribution. Just like deciding who can attend your garage sale, you need to decide where your app will be available. Can users worldwide download it, or only those in specific countries? This is important because the app regulations, language, and preferences can vary from one region to another.

Here’s how to set it up:

A. Decide on Pricing: In the Google Play Console, you’ll find a section called ‘Pricing & Distribution’. Here, you can set your app as free or paid. Remember, once set as free, it can’t be changed to paid later. For a paid app, you decide the price. And just like how you might offer a special deal on your comic books, you can also set up in-app purchases or subscriptions in your app.

B. Set Up Distribution: In the same ‘Pricing & Distribution’ section, you can choose the countries where your app will be available. It’s like putting up signs for your garage sale – the more places you put up the signs, the more people can come to your sale.

Setting up pricing and distribution is an exciting phase in publishing an app. It’s when you decide the value of your app and who can benefit from it. And just like the joy of seeing people appreciate the items at your garage sale, knowing that your app is out there, available to users, and providing value, brings immense satisfaction. It’s the culmination of all your hard work and creativity – your very own digital garage sale!


11. Rollout Release to Publish Your App

Rolling out the release to publish your app is a moment of excitement, anticipation, and satisfaction. Just like the joy when your friend walks into the surprise party, seeing your app live on the Play Store is an incredibly rewarding moment.

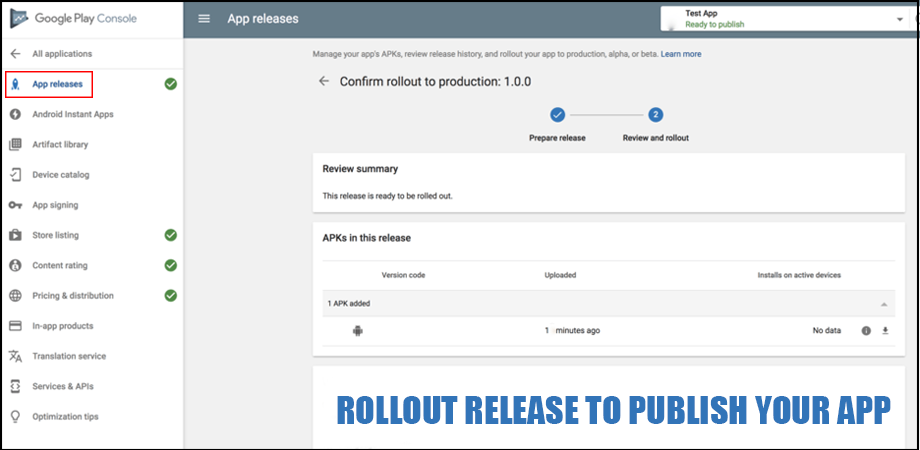
Let’s imagine you’ve planned an elaborate surprise party for a friend. You’ve done everything – invited the guests, decorated the venue, arranged for food and music – and now, it’s time to turn off the lights and wait for the birthday boy/girl to arrive. This final, thrilling step is similar to rolling out the release to publish your app on the Google Play Store.

After all the careful planning, creating, and preparing, it’s time to hit the ‘Publish’ button and make your app live. But just like you wouldn’t want all the guests to shout ‘surprise’ before your friend steps into the room, it might be a good idea not to release your app to everyone all at once.

Google Play Store allows you to roll out your app release gradually. It’s like planning smaller surprise parties before the big ones. This helps you to gauge the reaction of a small group of users, fix any unforeseen issues, and then extend the release to more users.

Here’s how it works:

A. Prepare for Release: In the Google Play Console, you need to prepare a release. This is like double-checking the party arrangements before the guests arrive. It involves reviewing and finalizing all the details you’ve set up earlier – from app name, icon, and pricing to distribution and content rating.

B. Rollout Release Gradually: Next, you can choose to roll out the release to a percentage of users. Maybe start with 10% or 20%, like inviting a few guests first to test the surprise. This allows you to monitor the app’s performance, gather feedback, and ensure that everything works perfectly.

C. Increase the Rollout or Full Release: Based on the response and performance, you can increase the rollout percentage or go for a full release. This is like seeing the first few surprise parties go well and then organizing the big one.

Rolling out the release to publish your app is a moment of excitement, anticipation, and satisfaction. Just like the joy when your friend walks into the surprise party, seeing your app live on the Play Store is an incredibly rewarding moment. It’s the culmination of all your hard work, creativity, and careful planning – the final ‘Surprise!’ in the journey of publishing your app.


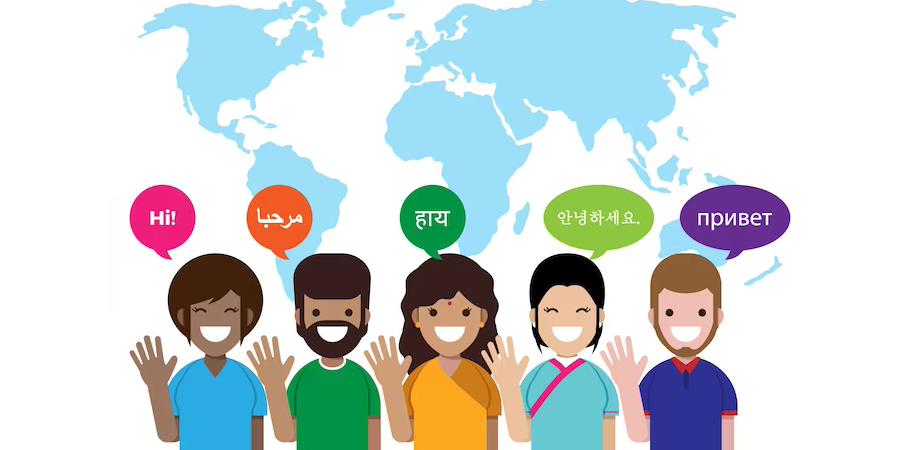
12. Languages and Translations

By considering languages and translations, you're not just spreading your app to more users; you're also respecting cultural diversity and bridging language barriers.

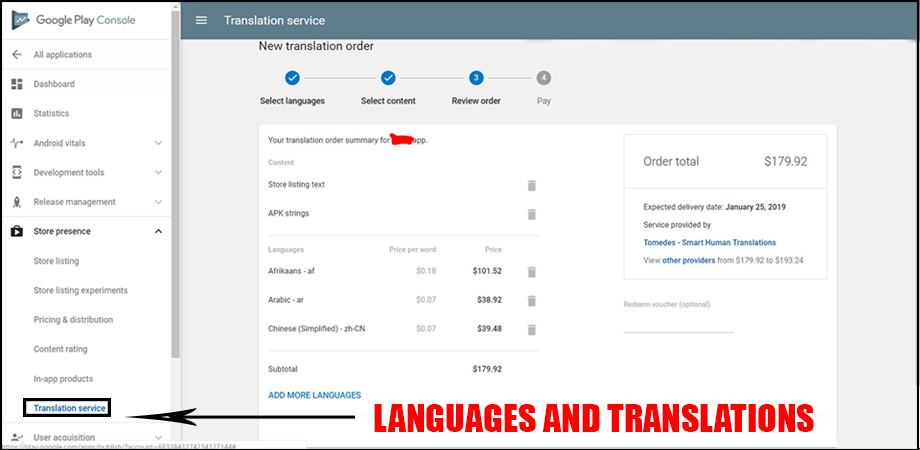
Picture this: You’ve just baked the best chocolate cake ever. It’s delicious, and you want to share the recipe with the world. But there’s a catch. Not everyone speaks your language. To share the recipe with more people, you need to translate it into other languages. This scenario is similar to considering languages and translations when publishing an app on the Google Play Store.

In the digital world, your app is like a chocolate cake recipe. It’s something valuable that you want to share. But not all potential users speak or understand the same language. By translating your app’s content and listing it in other languages, you’re opening the door for more people to access and appreciate your app.

Let’s break it down:

A. Identify Your Audience: The first step is to know who your users are and what languages they speak. This is like knowing that some of the friends you want to share the recipe with speak Spanish, some speak French, and others speak Italian.

B. Translate Your App and Store Listing: Now, you take your app (the recipe) and translate all the relevant information into the selected languages. This is done within the Google Play Console. Just like translating the recipe, this could include the app’s name, description, and even the content within the app itself.

C. Apply the Translations: Once translated, these details can be applied to the appropriate regional store listings. This way, when a user in Spain (for example) looks up your app, they will see the store listing in Spanish. It’s like giving your Spanish-speaking friend the recipe written in Spanish.

By considering languages and translations, you’re not just spreading your app to more users; you’re also respecting cultural diversity and bridging language barriers. It’s the digital equivalent of sharing your love for baking with the world, one chocolate cake recipe at a time. And who knows, maybe your app, like your chocolate cake, could become someone’s favorite in a country far, far away.


13. Setup up Contact details

Let’s imagine you’re at a park flying your newly crafted, colorful kite. It soars high and catches the attention of everyone around. They’re mesmerized by its design and the skill with which you’re maneuvering it. Some of them might want to learn how to make such a beautiful kite or how to fly it that high. They would need a way to reach out to you, wouldn’t they? This is quite similar to setting up contact details when publishing an app on the Google Play Store.

Your app is like your kite, soaring high in the digital sky of the Play Store. People who download it might have questions, need help, or want to give suggestions on how it could be better. That’s why Google requires you to provide a valid way for them to contact you.

Here’s how you can do this:

A. Choose a Contact Method: You need to decide the best way for users to reach you. This could be an email address, a website, or a phone number. Choose a method that you are comfortable with and can manage efficiently.

B. Enter Your Contact Details: In the Google Play Console, you’ll find a place to enter your contact details. It’s like writing your contact information on the tail of your kite. Anyone who needs to reach you can find it there.

C. Ensure it’s Valid and Active: Make sure that the contact information is accurate and active. There’s nothing more frustrating for a user than trying to reach out for help only to find that the email bounces back or the website doesn’t exist.

By providing a way for users to reach you, you’re showing them that you care about their experience and value their feedback. It creates a sense of trust and openness, much like making new friends at the park who are interested in your kite.

Remember, your app’s journey doesn’t end when it goes live on the Play Store. It’s just like your kite – to keep it soaring, you need to pay attention to the winds, adjust the string from time to time, and sometimes, even fix a tear or two. Setting up contact details is your way of staying connected with your users, ensuring your app keeps flying high.


Conclusion:


Publishing an app on the Google Play Store is a systematic journey. It starts with setting up a developer account, designing the app in the Google Console, and crafting an attractive store listing. The app’s readiness is tested by uploading the APK for review. An appropriate content rating is provided, the app is priced, and your merchant account is linked for revenue collection. The app’s identity is defined through its name and icon, and language options ensure it can reach a global audience. You provide contact details for user support, and finally, roll out the release for users worldwide to enjoy. This intricate process is what transforms your creative idea into a reality on the Google Play Store.

Experiencing roadblocks on your path to app publication? Our team at [Your Company] is here to simplify the process. Reach out to us now.

How Much Does It Cost To Create An App In 2023?

In today’s digitized world, having a mobile app for your business has become more of a necessity than a luxury. Regardless of the industry or scale of your business, having a mobile application can bring innumerable benefits. From boosting visibility to improving customer engagement, an app offers many advantages. However, one question that often arises is, “How much does it actually cost to create an app in 2023?”

The costs associated with app development are not static and can vary considerably based on many factors. From the complexity of the app, its features, and its design to the geographical location of the developers, many aspects come into play when determining the cost of creating an app.

Understanding these costs can seem daunting, but fear not, for this comprehensive guide is here to demystify the intricacies of app development costs. Our detailed exploration will break down the various factors influencing the price and provide you with the necessary knowledge to confidently embark on your app development journey. Whether you’re an entrepreneur looking to enhance your business, a start-up founder with a revolutionary idea, or simply curious about the app development process, this guide will be your roadmap to understanding the costs of creating an app in 2023. Let’s navigate this intriguing realm together.


How Much Does It Cost To Create An App In 2023?

When it comes to app development costs, it's not just about a single figure; it's a sum of various components, each playing a vital role. This section will take you through the main elements such as planning, design, feature development, infrastructure, testing, and maintenance, that collectively form the overall cost.

When it comes to app development costs, it’s not just about a single figure; it’s a sum of various components, each playing a vital role. This section will take you through the main elements such as planning, design, feature development, infrastructure, testing, and maintenance, that collectively form the overall cost. By understanding these elements, you’ll be better equipped to manage your budget and expectations for your app creation journey in 2023. Let’s delve into these components to understand what makes up the cost of creating an app.

1. App Development Costs

All the stages - planning, design, development, and testing - contribute to the overall cost of app development.

The Blueprint: Planning Your App

Let’s think of creating an app like building a house. You wouldn’t just start putting bricks together randomly, would you? You’d have a design, decide how many rooms there would be, what type of materials you’d use, and much more. In the same way, creating an app isn’t just about coding. There’s a whole lot of thinking, planning, designing, building, and testing that goes into it before your app can finally make its way to people’s phones.

The Design: Creating a Visually Appealing App

The first part of creating an app, similar to building a house, is coming up with a blueprint or a plan. This is where you decide what you want your app to do. Let’s say you want to make a fun game app. You’ll have to think about the game’s rules, the characters, the levels, and so much more. This is called the planning phase, and it requires time and expertise, contributing to the cost.

Next comes the design phase. This is where you decide how your app will look. The colors, the buttons, the screens – everything that makes your app visually appealing and easy to use. It’s like choosing the paint, tiles, and decor for your house. If the design is attractive and intuitive, more people would want to download and use your app, just like more people would want to visit a well-decorated house.

After you’ve planned and designed your app, it’s time to start building it. This is where the coding happens. It’s like the actual construction phase of a house. Developers write lines of code to turn your idea and design into a functioning app. Depending on how complex your app is, this can take a lot of time and resources.

The Inspection: Testing Your App

Once the app is built, you need to test it. Testing is like a house inspection before you move in. It helps find any bugs or issues that might spoil the user’s experience. Just like you wouldn’t want your roof to leak in the rain, you wouldn’t want your app to crash when users are playing the game. Testing ensures that everything works as it should.

The Investment: Cost of App Development

All these stages – planning, design, development, and testing – contribute to the overall cost of app development. Each of these stages is like a piece of a puzzle that fits together to create your perfect app. And just like building a house, creating an app requires an investment, not just of money, but also of time, creativity, and effort.

2. Choice of App Development Platform

Choosing the Platform: Android vs. iOS

Choosing the Platform: Android vs. iOS

Imagine you’re creating a new video game. You know it’s the most fantastic game ever, with adventurous quests and cool characters. But there’s one big decision you need to make before you start. Will your game be available for PlayStation fans, Xbox enthusiasts, or computer gamers? Each platform has its own set of rules, its own kind of players, and its own unique way of making your game come to life. Similarly, one of the most crucial decisions in the process of app development is selecting the platform on which your app will be available.

Android: The Wild, Open-World Game

You’ve got two main choices here: Android, used by brands like Samsung and LG, and iOS, used by all those shiny Apple devices like iPhones and iPads. Each platform has its own ‘personality’, just like different gaming platforms. Android is like a wild, open-world game, where you have more freedom to do things your way. On the other hand, iOS is more like a carefully designed adventure game, with more strict rules but a smooth, refined experience.

The Cost Factor: Developing for Android vs. iOS

The platform you choose can significantly impact your app development costs. Building an app for Android can be like creating a game that works on different types of computers with different specifications. There are many different Android devices out there, each with its own sizes, capabilities, and versions of Android. This can make development and testing more complex and time-consuming, potentially driving up costs.

On the flip side, creating an app for iOS is more like making a game for one type of gaming console. Since Apple has fewer device models and more standardized operating systems, it might be quicker to develop and test an app, which can be less costly.

The Audience: Reaching the Right Players

However, the decision isn’t just about costs. It’s also about who you want to reach with your app. Android has a larger user base worldwide, which might make it a better choice if you want your app to reach as many people as possible. But iOS users tend to spend more on apps, which could be crucial if your app relies on in-app purchases or subscriptions.

3. Cost Based on Team Roles

A team of passionate, emerging talents might bring innovative solutions and unique perspectives to your app development, potentially offering a balance between cost and quality.

Creating an app isn’t a one-man show. It’s more like making a movie. Just as you need a director, scriptwriter, actors, and cameramen for a movie, you need a variety of roles filled to build an app. Each of these roles brings their unique skills to the table and contributes to the cost of creating your app in 2023. Let’s look at who these key players are.

The Project Manager: Directing the Show

First up, we have the project manager. They’re like the director of your movie, ensuring everything goes according to plan. They oversee the entire project, keeping things on track and making sure everyone is working together effectively.

UI/UX Designers: Creating the Visual Story

Next, we have the UI/UX designers. They’re like the set designers in a movie, deciding how everything should look and feel. Their job is to make sure your app is not only beautiful but also easy and enjoyable to use.

App Developers: Bringing the App to Life

Then there are the app developers, the stars of the show. They’re like the actors, bringing the script (or in this case, the app design) to life. Developers are the ones who write the code that makes your app function.

Quality Assurance Testers: Polishing the Final Cut

Last but not least, there are the quality assurance testers. Just as a movie needs editors to catch any errors or inconsistencies, your app needs testers to ensure everything works as it should. They find and fix any bugs to ensure your app runs smoothly.

Considering the Cost Factors

Now, the cost of creating an app depends a lot on these team members. Just as hiring Oscar-winning actors or a famous director would make a movie more expensive, the expertise level of your app development team will affect the cost. If you hire highly experienced professionals, they might charge more, but they could also deliver top-notch quality and finish the job faster.

But there’s also a twist in this tale. Sometimes, a young, enthusiastic actor might bring more energy and fresh ideas to a movie. Similarly, a team of passionate, emerging talents might bring innovative solutions and unique perspectives to your app development, potentially offering a balance between cost and quality.

4. App Maintenance Costs

You need to protect your app and its users from any potential threats. This might involve regular security updates and monitoring, ensuring the safety of your users' data. It's most important in app development.

App Maintenance: Taking Care of Your App

Think about when you get a new pet. It’s not enough to just bring a puppy home; you need to take care of it. It needs food, regular vet check-ups, and lots of love. Similarly, creating an app isn’t a one-time event. Once it’s launched, it needs regular care and attention to keep it running smoothly. This ongoing care, known as app maintenance, is an essential part of the overall cost of having an app in 2023.

Updates: Nurturing Growth and Adaptation

Let’s start with updates. Just like your pet grows and changes, your app needs to evolve. As technology advances and trends change, your app should also be updated to keep up with the times. Maybe it’s adding new basic features or improving the ones you have. These updates are like the healthy food and exercise that keep your pet in top shape.

Bug Fixing: Diagnosing and Treating Issues

Then there’s bug fixing. Even with the best planning and testing, some bugs might slip through. They’re like the unexpected health problems that can pop up with your pet. You need to diagnose the problem and fix it quickly to keep your app healthy and running smoothly. This requires time and expertise, adding to the maintenance costs.

Scalability: Adapting to Growing Needs

Don’t forget about scalability. If your app becomes super popular (which we hope it does!), you need to be prepared to handle a lot more users. This might require upgrading your servers or improving your app’s performance. It’s like moving from a small apartment to a bigger house because your pet has grown bigger than you expected.

Security: Safeguarding Your App and Users

Last but not least, there’s security. Just as you’d protect your pet from harm, you need to protect your app and its users from any potential threats. This might involve regular security updates and monitoring, ensuring the safety of your users’ data.

5. Cost Per Hour of Specialists

When creating an app, you hire specialists who are experts in their fields. These professionals charge for their services by the hour, and their rates significantly impact the total cost of creating an app.

App Development Professionals: The Concert of Expertise

Building an app is a lot like organizing a concert. You wouldn’t ask your next-door neighbor (unless they’re really talented!) to perform at a big event, would you? Instead, you’d hire professional musicians who have mastered their instruments. Similarly, when creating an app, you hire specialists who are experts in their fields. These professionals charge for their services by the hour, and their rates significantly impact the total cost of creating an app in 2023.

Software Developers: The Headliners of App Development

Think about our concert again. The main attraction might be a world-class violinist. Their years of training and unique skill would command a higher price. Likewise, in the app development world, the software developers are your headliners. They are the ones who translate your vision into lines of code that make your app function. Their expertise level and experience can dictate their hourly rates.

UI/UX Designers: Crafting the Perfect Experience

Then you have the indispensable sound technician, who makes sure everything sounds perfect during the concert. In the app world, these are your UI/UX designers. They ensure your app looks good and provides a user-friendly experience. Their ability to craft an enjoyable user interface is critical, so their per-hour cost can also add significantly to your app creation budget.

Project Managers: Orchestrating the App Development Process

Let’s not forget about the concert organizer, who coordinates the entire event. In an app development company, that’s your project manager. They keep everything running smoothly, ensuring the project stays on track and within budget. Their time and expertise, too, come at an hourly cost.

Varied Rates and Value for Money

The rates for these specialists can vary based on several factors. Just like a renowned musician would charge more for their performance, experienced professionals in app development command higher rates. But remember, a talented emerging artist can also give a mesmerizing performance, maybe even adding a fresh sound to the concert. Similarly, less experienced but talented professionals might offer innovative solutions at a lower cost, providing excellent value for money.

6. Geographic Location of the Team

the cost of creating an app in 2023 can also be influenced by where your development team is located.

App Development Costs: A Global Shopping Trip

Have you ever wondered why a pair of sneakers is more expensive in one country than another, even though they’re the same brand and model? This has a lot to do with where they’re being sold. Just like the price of sneakers, the cost of creating an app in 2023 can also be influenced by where your development team is located.

North America: High-End Quality at a Premium

Imagine you’re planning a virtual road trip across the world. You start in North America, where you might find that development costs are relatively high. It’s like shopping in a high-end mall – the quality and service are top-notch, but you might pay a premium for it.

Western Europe: High-Quality with a Smaller Price Tag

Next, you decide to visit Western Europe. Here, you’ll also find highly skilled professionals, but the costs might be slightly lower. It’s like finding a boutique store that offers high-quality products but with a smaller price tag.

Eastern Europe and Asia: Great Deals Without Compromising Quality

As you continue your trip and move to Eastern Europe or Asia, you’ll find the development costs can be significantly lower. But that doesn’t mean the quality is any less. It’s like shopping at an outlet store where you can find great deals without compromising on product quality.

Factors Behind the Price Variations

Why does this happen? Well, the cost of living, economic conditions, and market competition in different parts of the world can affect how much professionals charge for their services. And with today’s technology, you can easily work with a team that’s located anywhere in the world.

Choose Wisely: Stretching Your Budget Without Sacrificing Quality

Choosing a team in a location with lower development costs can be a smart way to stretch your budget without sacrificing quality. However, it’s essential to remember that good communication and a shared understanding are critical for your project’s success. So, even as you shop around the world for your ideal development team, make sure you’re also finding a team that understands your vision and can bring it to life.

7. Native or Cross-platform Development

when you're creating an app in 2023, you come to a critical decision point: Should you go for native or cross-platform development? This choice significantly impacts your journey's direction, experiences, and, of course, the cost.

Choosing the Path: Native or Cross-Platform Development

Imagine you’re standing at a fork in the road in the middle of a fascinating journey. One path leads to a tranquil forest; the other takes you across a bustling city. Each route offers its own unique experiences and challenges. Similarly, when you’re creating an app in 2023, you come to a critical decision point: Should you go for native or cross-platform development? This choice significantly impacts your journey’s direction, experiences, and, of course, the cost.

The Forest Path: Native Development

Let’s first explore the forest path, the equivalent of native development. Here, you are building an app exclusively for one type of device—either iOS (Apple) or Android. This path allows you to leverage all the specific advanced features and capabilities of that chosen platform, giving users a smooth and high-quality experience. It’s like immersing yourself fully in the beauty and tranquility of the forest, paying attention to every leaf and tree. But this tailored experience can come at a higher cost and might take more time, as you’d essentially be building separate apps if you want to reach both iOS and Android users.

The City Path: Cross-Platform Development

Now, let’s look at the bustling city path or cross-platform development. Here, you’re building an app that can run on both iOS and Android devices. It’s like taking a high-speed train through the city, where you get to see and experience different neighborhoods at the same time. This method can be quicker and more cost-effective because you’re building one app that works on multiple platforms. But the trade-off is that it may not fully utilize the unique features of each platform, potentially leading to a slightly less optimized user experience.

Choosing Your Path: Considerations and Trade-Offs

Making the right choice between native and cross-platform development depends on your specific needs and goals. If you want to deliver the best possible user experience and have the budget and time for it, then walking the native path might be the right choice for you. But if you need to reach both iOS and Android users quickly and cost-effectively, then taking the fast train of cross-platform development could be your best bet.

8. Impact of App Features on Cost

the features you decide to include in your app play a big role in determining the cost of creating it in 2023.

Designing Your App: Adding Features and Determining Costs

Imagine you’re designing your dream house. You have an idea in your head – a stunning living room, a cozy bedroom, and a modern kitchen. Now, what if you want a swimming pool in the backyard? Or a movie theater in the basement? Each of these features makes your house more amazing but also adds to the overall cost. In a similar way, the features you decide to include in your app play a big role in determining the cost of creating it in 2023.

Fundamental Features: The Living Room and Kitchen

Think of each feature in your app as a room in your house. Some features (or rooms) are fundamental, like user registration or a navigation menu. They’re like the living room and kitchen of your house – pretty much essential. While these features are necessary, they still contribute to the overall cost.

Extraordinary Features: The Home Theater and Outdoor Pool

Then there are some features that take your app from ordinary to extraordinary, just like a fancy home theater or an outdoor pool would for your house. Maybe it’s an advanced search function, or the ability to make in-app purchases. Or it could be integrating the app with other platforms, like social media. These features provide additional value to the user, making your app more attractive and enjoyable to use. But remember, the more complex and numerous the features, the higher the cost of creating the app will be.

Balancing Features and Costs

Adding features to an app is like adding rooms to a house – it involves design, planning, and construction. It’s important to note that more features not only increase the time it takes to build the app, but can also impact future costs such as maintenance and updates.

Just like you wouldn’t add a room to your house without considering the costs and benefits, you shouldn’t add a feature to your app without careful thought. It’s all about balance – providing value to the users while keeping the costs within your budget.

9. Cost Reduction Through Cross-platform

Cross-platform development provides a 'shortcut' to reduce costs and save time.

Taking the Cross-Platform Shortcut: Streamlining App Development

Imagine you’re planning a road trip. You’ve packed your bags, planned your stops, and are all set for an epic adventure. However, your goal is to visit two popular attractions located in different directions. You could travel to each destination separately, taking the time and gas to go back and forth. Or you could find a magical shortcut that leads you to both places without the extra travel. That’s exactly what cross-platform development does when creating an app in 2023 – it provides a ‘shortcut’ to reduce costs and save time.

The Magic of Cross-Platform Development

Cross-platform development is like that magical road that leads to both destinations simultaneously. It’s a way of building one app that runs seamlessly on both Android and iOS devices. Imagine creating an all-in-one app like this as writing a story that can be understood and enjoyed by people speaking different languages without needing to translate it separately each time.

Cost and Time Savings

By choosing this path, you save on costs in several ways. For starters, instead of hiring two separate teams to code for Android and iOS, you just need one team that can do both. It’s like packing one suitcase that works for different types of weather, instead of packing two separate ones. This way, Android app development becomes part of a comprehensive strategy, reducing both financial and logistical burdens.

Moreover, cross-platform development requires less time than developing two separate apps. Imagine how much faster your road trip would be if you had a shortcut that allowed you to visit two places at once. You’d save on travel time, and hence, on fuel costs. Similarly, by developing an app that works on both platforms at once, you save on development time and costs.

Considerations and Exceptions

But keep in mind, this magical road might not be the best choice for everyone. Just like some road trips are best enjoyed taking the long route, some apps benefit from being developed separately for Android and iOS. These apps can take full advantage of each platform’s specific features, providing a potentially better user experience.

10. Prioritizing Features to Reduce Cost

Creating a Delicious App: Prioritizing Features to Fit Your Budget

Picture this: you’re at an ice cream parlor, excited to build your own sundae. There are dozens of delicious toppings to choose from – sprinkles, hot fudge, cherries, whipped cream, nuts, and so much more. But there’s a catch. You have a limited budget, and each topping adds to the cost of your sundae. So, what do you do? You prioritize. You select the toppings that you love the most and that will create the perfect sundae for you. The same strategy applies when you’re deciding which features to include in your app in 2023.

The Essential Base: Necessary Features

Think of each potential feature for your app as a topping for your sundae. Each feature will make your app more delicious to your users, but it will also add to the cost of creating the app, just like adding extra toppings increases the price of your sundae.

In an ideal world, we would add all the toppings, right? But with a set budget, you have to make some tough decisions. This is where prioritizing comes in. You should first consider what’s absolutely necessary – the vanilla ice cream base of your app. These are features like user registration, basic navigation, and essential functionalities.

The Standout Flavors: Unique and Enjoyable Features

Next, consider the toppings that will make your app stand out – the hot fudge and whipped cream. These are special features that aren’t strictly necessary but will make your app unique and more enjoyable for your users.

The Cherry on Top: Nice-to-Have Features

And then, you have the cherry on top – features that are nice to have if the budget allows but won’t break your sundae (or app) if you have to leave them out.

Building the Perfect App Sundae

Just like you want the most delicious sundae that fits within your budget, you want the best app that fits within your development budget. By prioritizing your features, you can ensure you get the most bang for your buck, creating an app that both meets your users’ needs and doesn’t break your budget.

11. Backend Infrastructure

There's a lot of behind-the-scenes work that goes on which users never see but absolutely appreciate. This is where backend infrastructure comes into play.

Behind the Curtain: The Importance of Backend Infrastructure in App Development

Imagine that you’re in a magic show and you witness the magician pull off some really cool tricks. Now, you don’t see all the preparation that goes into making the magic happen, but you appreciate the result, don’t you? The same principle applies to creating an app in 2023. There’s a lot of behind-the-scenes work that goes on which users never see but absolutely appreciate. This is where backend infrastructure comes into play.

The Backstage of the Magic Show: The Role of Backend Infrastructure

The backend infrastructure is like the backstage of the magic show – it’s where all the preparation and management happens. It’s the server where your app’s data is stored and retrieved, the systems that keep the app running smoothly, and the security measures that protect your app and its users. In simpler terms, it’s the engine of your car, you don’t see it when you’re driving, but it’s what makes the car move!

Using a Social Media App as an Example

Let’s take an example of a social media app like Instagram. The pictures you post, the friends you follow, the comments you make – all these actions need to be stored and managed somewhere. And that’s the job of the backend infrastructure.

The Cost of Backend Infrastructure

But why does backend infrastructure cost money? Well, think of it this way. To pull off the magic tricks, the magician needs a hat, a rabbit, and maybe even a wand. In the same way, the backend infrastructure needs servers to store data, systems to manage it, and security measures to protect it. And these resources come at a price.

The User Experience Connection

Even though users might not directly see the backend infrastructure of your app, they definitely experience it. If your app is slow, crashes often, or loses data, users are going to be pretty unhappy. On the other hand, if your app runs smoothly and securely, users will be delighted – just like they are when the magician pulls off a flawless trick.

12. Localization & Multi-Language Support

Localization & Multi-Language apps helps to target a huge group of users.

Breaking Barriers: The Importance of Localization and Multi-Language Support in App Development

Picture this: you walk into a store but all the labels are in a language you don’t understand. You’d feel lost, wouldn’t you? Now imagine the store owners noticed your confusion and immediately changed all the labels into your language. That would be pretty amazing, right? You’d feel welcome and understood. This same idea is the driving force behind localization and multi-language support in app development.

The Power of Localization: A Tale of TikTok

Let’s take a fun, popular app like TikTok as an example. When you open the app in America, you see everything in English. But, open the same app in Spain, and voila! It’s all in Spanish. This isn’t magic—it’s the result of careful localization and multi-language support.

The Importance of Connection

But why is this important and what does it have to do with the cost of creating an app in 2023?

When you want to create an app, you don’t want it to be enjoyed by just a small group of people, right? You’d want people all over the world to use and love your app. And for that, they need to be able to understand it. It’s like the store owners changing the labels into your language. When an app speaks a user’s language, they’re more likely to use it and feel connected to it.

The Cost of Connection

However, providing this connection comes with a cost. Translating an app into another language isn’t just about changing words. It’s about understanding and respecting cultural nuances, like the way dates are written or how much information is acceptable to ask from users. This requires experts who know the language and the culture. Plus, you also need to adapt your app’s code to support these different languages, which takes time and technical skills.

The Reward of Happy Users,

However, remember how happy you felt when the store labels were in your language? Well, users feel the same way when they see an app in their own language. And happy users are more likely to continue using your app, share it with their friends, and even spend money on it.

13. User Profile & Social Login

User profile isn't just for fun - it's an essential part of the app. It lets the app know who the users are, like the club recognizing its member.

User Profiles and Social Logins: Creating a Personalized App Experience

Imagine you’re walking into a club and the bouncer doesn’t let you in because you didn’t bring your ID. It’s frustrating, right? But if you’re a member of the club and they recognize you, you get in without any trouble. This is what user profiles and social logins in apps are like.

The Power of User Profiles

Think about your favorite game or social media app. You probably have a profile, right? You have a username, maybe a picture, and there’s information about your achievements or posts. This profile isn’t just for fun – it’s an essential part of the app. It lets the app know who you are, like the club recognizing its member.

Behind the Scenes: Developing User Profiles

But why does this matter when we talk about the cost of creating an app?

Well, think about what it takes to make these profiles. Developers have to write code that allows users to create and customize their profiles. They have to ensure that users’ data is stored safely and that the app can retrieve this data whenever needed. And these aren’t easy tasks. They require skilled developers and time, which contribute to the cost.

The Convenience of Social Logins

Now, what about social logins? You know when you download a new app and it gives you an option to “Sign up with Google” or “Sign up with Facebook”? That’s a social login. It’s like a VIP pass that lets you into the club without having to go through the regular process.

The Work Behind Social Logins

Implementing social logins also requires extra work. Developers have to integrate the app with these social media platforms and ensure that the data shared between them is secure. Again, this adds to the cost.

The Value of User Profiles and Social Logins

However, having user profiles and social logins in your app is like rolling out the red carpet for your users. It makes them feel special and welcome. It saves them from the frustration of having to remember another password and lets them jump straight into enjoying your app. And when users feel this way, they’re more likely to keep using your app and even tell their friends about it.

14. App Analytics and Usage Tracking

App Analytics & Usage Tracking helps developers understand what users love about the app, and what needs to be improved. This can lead to better updates, a better app, and happier users.

Understanding User Behavior with Analytics and Usage Tracking

Imagine you’re a detective and you’ve been assigned to solve a mystery. But this isn’t a typical crime mystery. Your mission, should you choose to accept it, is to figure out how people are using a certain mobile app. Are they using it every day? What features do they use the most? Do they face any problems while using it? This might seem like a peculiar task for a detective, but in the world of mobile app development, this type of investigation is absolutely critical.

The Importance of User Data

Why, you ask? Well, think of it this way. Let’s say you own a store and you want to know what products are selling the best, what times are the busiest, and what areas of the store people spend the most time in. Having this information allows you to make your store better and increase your sales. In a similar vein, understanding how people use an app can help developers improve it and make it more successful.

The Power of Analytics and Usage Tracking

To do this, app developers use tools called ‘analytics’ and ‘usage tracking’. These tools collect data about how users interact with the app. They can show how many people are using the app, what features they use the most, how long they stay on the app, and much more.

The Cost of Implementing Analytics

Setting up these tools is like setting up cameras and sensors in your store to gather data. And just like buying and installing these cameras and sensors would cost money, so does integrating analytics and usage tracking tools in an app. This is why they contribute to the overall cost of creating an app.

The Value of User Insights

But remember our detective analogy? The information these tools provide is invaluable. It’s like having a superpower that lets you see into the minds of your users. It helps developers understand what users love about the app, and what needs to be improved. This can lead to better updates, a better app, and happier users.

15. Cost of Quality Assurance

Quality Assurance Process helps prevent the issues from occurring, ensuring that when users download the app, they get a seamless, enjoyable experience.

Ensuring App Quality with Quality Assurance

Imagine you’re going on a big adventure, perhaps a trek through a dense jungle. You’ve got your backpack ready, filled with all the things you need: a compass, water, food, a first-aid kit, and much more. Now, you wouldn’t just rush into the jungle without first checking everything, would you? You’d want to ensure your compass works, that your food hasn’t expired, and that your first-aid kit is fully stocked. That’s a bit like what quality assurance in app development is.

The Importance of Quality Assurance

Quality Assurance, or QA for short, is the process of checking an app to make sure it works as it should. It’s like a dedicated team of explorers examining every nook and cranny of the jungle before you set off, ensuring there are no hidden dangers that might trip you up. In the app world, these ‘dangers’ could be things like bugs, errors, or features that don’t work properly.

The Cost of Quality Assurance

Now, as you can imagine, having a team of people to test the app and make sure everything is okay is going to add to the cost of creating it. Much like hiring guides for your jungle trek would. However, it’s an essential part of the process. Without it, you risk releasing an app that’s full of issues, which is as dangerous as heading into a jungle without checking your gear. Nobody wants to download an app that crashes all the time or has features that don’t work.


The Value of a Seamless User Experience

Think about your favorite game or app. What if it suddenly stopped working or started behaving oddly? It would be pretty frustrating, right? That’s why the QA process is so important. It helps prevent these issues from occurring, ensuring that when users download the app, they get a seamless, enjoyable experience.

16. Cost of Project Management

an app development project with strong project management will be more efficient, more likely to stay within budget, and more likely to result in a successful app.

Smooth Sailing with Project Management in App Development

Let’s set sail on an exciting voyage. We’re on a colossal ship, leaving the comfort of the harbor, and venturing out into the vast open ocean. Now, every ship needs a captain, right? Someone to navigate, plan the journey, and make sure everything runs smoothly, and that we reach our destination. In the world of app development, this role is played by Project Management.

The Importance of Project Management

Creating an app isn’t just about coding. It’s about coordinating a whole bunch of tasks, much like coordinating the crew of a ship. There are designers who sketch out how the app will look, developers who bring these designs to life, and testers who ensure the app is shipshape and ready for users. To ensure all these tasks come together at the right time and in the right way, you need project management.

The Cost of Project Management

Now, hiring a project manager does add to the cost of creating an app, similar to hiring a captain for our ship. But this is one cost that can save a lot more. Think about it. Without a project manager, it would be like sailing a ship without a captain. You could drift off course, hit an iceberg, or get lost at sea.

The Benefits of Effective Project Management

In the app development world, drifting off course could mean missing a crucial step in the process. Hitting an iceberg could mean encountering a significant problem that could have been avoided with proper planning. Getting lost at sea might mean extending the timeline of the project, leading to increased costs and potentially missing important opportunities.

The Role of Project Management

Remember, a well-guided ship reaches its destination faster and more efficiently. Similarly, an app development project with strong project management will be more efficient, more likely to stay within budget, and more likely to result in a successful app.

17. Involving Quality Assurance Early On

if QA is involved from the start, they can spot potential problems early on, when they are easier and less expensive to fix.

Quality Assurance: Ensuring a Thrilling Ride in App Developmen

Let’s imagine a fun day at an amusement park. You’ve been anticipating this day, waiting for the moment when you can finally hop onto your favorite roller coaster. The ride begins and just as you are about to experience the peak excitement, it suddenly halts due to a mechanical issue. Disappointment washes over you as the thrill turns into frustration. You waited in line for hours, all for an experience that didn’t live up to the expectation.

The Importance of Quality Assurance

Similarly, in the realm of app development, people download an app with certain expectations. They’re hopping onto a roller coaster ride they hope will be thrilling, useful, and fun. But if there’s a glitch or a bug that stops them in their tracks, it can leave them feeling frustrated and disappointed.

The Role of Quality Assurance

This is where Quality Assurance (QA) comes into play. Think of QA as the ride inspectors at our amusement park. Their job is to check every bolt, every gear, and every last detail of the roller coaster, making sure it’s all running smoothly before it’s open to the public. This prevents any disappointment or unexpected surprises.

The Cost of Quality Assurance

Involving QA early in the app development process may seem like an extra cost. It’s like hiring more ride inspectors to check the roller coaster even while it’s being built. But, consider the alternative. If a big problem is found after the whole app is built, fixing it can be like trying to change a major part of the roller coaster once it’s already been constructed. That’s going to be a lot more costly and time-consuming.

The Value of Early Involvement

In contrast, if QA is involved from the start, they can spot potential problems early on, when they are easier and less expensive to fix. It’s like noticing that a bolt is loose when the roller coaster is still under construction. Fixing it then and there is far easier and less costly than trying to fix it once everything’s been assembled.

18. App Patenting Cost

Obtaining a patent for your app is not free. This cost is a part of the overall app creation budget and includes things like attorney fees, filing fees, and sometimes even the cost of making adjustments to the application if required by the patent office.

Protecting Your Masterpiece: The Importance of App Patenting

Let’s take a little trip to the imagination land. Imagine, you’ve just crafted the most magnificent sandcastle at the beach. You’ve spent hours pouring over every detail, making sure each turret is perfect, and every wall is strong. You step back to admire your creation and it is, indeed, a thing of beauty. But then, out of nowhere, someone comes along, looks at your castle, and starts building an identical one. They didn’t put in the effort or the creativity, but they’re copying your masterpiece. It feels unfair, right?

The Value of Your App

In the world of app development, your app is your sandcastle. You’ve worked hard to come up with a unique concept, design, and functionality. After all that effort, you wouldn’t want someone else to just waltz in and copy your idea, would you? This is where the idea of patenting an app comes in. A patent is like a “No Copying” sign that you can put on your sandcastle.

The Cost of App Patenting

However, obtaining a patent for your app is not free. Just as buying a sign for your sandcastle costs money, so does the process of getting an app patented. This cost is a part of the overall app creation budget and includes things like attorney fees, filing fees, and sometimes even the cost of making adjustments to the application if required by the patent office.

Investing in Protection

Although this might sound like an extra cost that could be avoided, think about it this way: Would you rather spend a little now to protect your unique sandcastle or risk having to compete with a bunch of similar ones later? Paying for a patent is like an investment to protect your idea from being replicated, giving your app a better chance to shine uniquely in the target market.

Preserving Your Originality

Remember, your app is your masterpiece, the product of your hard work and innovation. Protecting it with a patent might come with a cost, but it’s a small price to pay for safeguarding your originality and creativity. In the grand scheme of things, it’s like buying that “No Copying” sign for your precious sandcastle.

19. Costs Associated With Supporting Legacy OS

Keeping the Classics Alive: Supporting Legacy Operating Systems in App Development

Imagine that you’ve got the latest and greatest video game console. You’ve been waiting for months, saved up your allowance, and finally, you have it in your hands. It’s sleek, powerful, and has all the latest features that make your gaming experience out-of-this-world amazing.

But, deep in your closet, there’s your old video game console. The one that doesn’t have the cool new graphics or the lightning-fast load times, but it’s filled with your favorite classic games that you still love to play. You could put it away forever, but there’s a part of you that wants to keep playing those games, even if it means keeping the old console running.

Legacy Operating Systems: The Old Game Console

In the world of app development, that old game console is what we call a ‘legacy operating system.’ It’s not as shiny or as efficient as the new ones, but there are still many people out there who use it and love it. When you’re creating an app, one of the decisions you have to make is whether you want your app to work on these older systems.

The Cost of Supporting Legacy Systems

Making your app compatible with legacy operating systems does come with a cost. It’s like having to pay for repairs and parts to keep your old game console working. The process might involve rewriting parts of the app’s code, testing it on multiple versions of the operating system, and dealing with unique quirks and features of the older software.

The Value in Reaching Out

However, there’s a bright side. By supporting these older systems, you’re reaching out to a whole group of users who might still be using them. It’s a bit like inviting all your friends over for a retro game night – sure, it’s a bit more work to set up and run, but the joy it brings to those involved can make it all worth it.

Considering User Needs and Feelings

Just like deciding to keep your old game console alive for the love of classic games, choosing to support legacy systems might require extra time and money, but it can also mean keeping a part of the user community happy. As you can see, this decision is not just about costs, but also about considering the needs and feelings of all potential app users.

20. Costs of Supporting Different Mobile OS Versions

Costs of Supporting Different Mobile OS Versions

Fitting the Puzzle Pieces: Supporting Different Mobile OS Versions in App Development

Imagine you’ve just got a massive, thousand-piece jigsaw puzzle as a birthday present. You’re eager and excited to get started. You tear off the wrapping, open the box, and pour all the pieces onto your living room floor. But as you start putting the pieces together, you realize that every piece is slightly different. Some are round, some are square, some are triangular, and they all come in different colors and patterns. This, in a nutshell, is what it’s like for app developers to support different mobile OS versions.

The Ever-Evolving Puzzle: Operating Systems Updates

In our tech-savvy world, operating systems – the basic software that makes our phones run – are constantly updating and evolving. Apple’s iOS, Google’s Android, and others each release new versions with fresh features and improved security. It’s like getting a new jigsaw puzzle box every few months but with slightly different pieces each time.

Fitting the Pieces: Adjusting App Code for Compatibility

App developers want their apps to fit perfectly on every user’s device, no matter what version of the operating system they’re using. This means they need to tweak and adjust their ‘puzzle pieces’ – the code of the app – to make sure it works seamlessly on each version. This task involves understanding the nuances of each version, testing the app meticulously, and sometimes reworking parts of the app to fit the new ‘shape’ of the OS.

The Cost of Compatibility: Increasing App Development Expenses

This undoubtedly increases the overall cost of app development. It’s like having to buy extra puzzle pieces or tools to make sure you can complete each new puzzle you get. But there’s a reason developers are willing to pay this price.

The Joy of Completion: Seamless User Experience

Imagine the sense of achievement you feel when you finally fit the last piece into that thousand-piece puzzle, and you can see the whole picture in its glory. Now, imagine the joy of an app user when their favorite app runs flawlessly on their device, giving them the best possible experience. For app developers, knowing they’ve created something that works beautifully for everyone, regardless of their OS version, is a feeling that can’t be matched.

21. Hiring an Outsourced Development Team

hiring an outsourced development team does add to the overall cost of creating an app. But it's also a valuable investment.

Navigating the App Development Journey: Hiring an Outsourced Development Team

Let’s pretend for a moment, you’re setting off on a grand adventure. You’re not just heading to your neighborhood park or the next town over. No, you’re going on a journey to a far-off land. You don’t know the language or the customs, and you certainly can’t navigate your way around. What do you do? You hire a skilled local guide, someone who knows the lay of the land, who can translate for you, who can take you where you need to go. This, in a way, is what hiring an outsourced development team is like when you’re setting out to create an app.

The Unfamiliar Landscape: App Development Challenges

The land of app development is filled with codes and commands, interfaces, integrations, algorithms, and app stores. It can seem intimidating, even downright bewildering if you’re new. That’s where an outsourced development team comes in. They’re your guides, your translators, your navigators in this land of lines of code and colorful app icons.

The Cost of Expertise: Investing in Outsourced Development

And hiring such a team is not a small expense. Just like hiring a guide for a long journey would be. It might even feel scary to hand over such an important task to a team that could be halfway across the globe from you. But here’s the thing – these are seasoned experts, with a compass in one hand and a map in the other. They know the routes to take, the pitfalls to avoid, and the shortcuts that can save time and money.

Guiding the Way: The Benefits of Outsourced Development

For example, let’s say you want to create a fitness app. A seasoned team could guide you through choosing the right features, like a calorie counter or a step tracker. They could show you how to make the app visually appealing and user-friendly, helping you navigate the complex terrain of user interface and experience. They could also steer you clear of common mistakes, like making the app too complicated or not testing it thoroughly before launch.

The Value of Assurance: An Investment in Success

Yes, hiring an outsourced development team does add to the overall cost of creating an app. But it’s also a valuable investment. It’s like paying for the assurance that you won’t get lost on your adventure and that you’ll reach your destination safely and successfully.


Conclusion:

Creating an app in 2023 involves various costs that go beyond just coding. The geography of your team, choice of platform, specific features, and the backend infrastructure all play vital roles in cost formation. Also, aspects like localization, user profiles, analytics, quality assurance, project management, and patenting costs can significantly add to the budget.

Supporting legacy OS and different mobile OS versions is an additional cost to consider. Hiring an outsourced development team, though possibly more expensive up front, may save you money in the long run.

However, remember that these costs can greatly vary based on your unique needs. App development is not just a cost center, it’s an investment that brings value to your business and your users. Use this guide to navigate the process, make informed decisions, and bring your app idea to life.

Contact us today if you’re eager to develop your own app and curious about the costs involved in 2023. Our expert team is ready and waiting to provide you with detailed guidance and support to bring your app to life.