Publishing an app on Google Play Store represents a significant step for developers to share their digital solutions with an extensive global audience. This process, although meticulously detailed, is achievable and can be a momentous achievement in the software development life cycle. It involves various stages including developing an app, preparing for its release, releasing it, and subsequently managing and tracking its performance. To ensure that this process is navigated smoothly, developers need to comply with Google’s policies and procedures, involving everything from submission and approval to monetization and performance optimization.
This article aims to offer a comprehensive guide on the process for publishing an app on the Google Play Store, detailing all necessary steps and providing key insights to enhance your understanding and execution of this critical process.
Process for Publishing an App on the Google Play Store
The following is the process for publishing an app on the google play store:
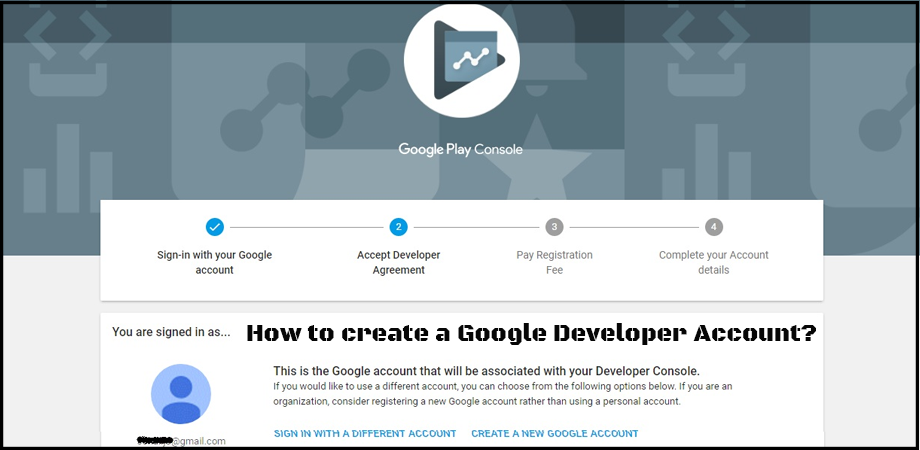
1. Create a Google Developer Account
Taking your first step into the world of app publishing can be as thrilling as stepping onto a roller coaster for the first time. Creating a Google Developer account, akin to getting your ticket for this exciting ride, is an essential part of this journey.
Think of it this way – imagine you’re an artist, and you’ve just finished your masterpiece painting. Now, you’re eager to showcase your work at a grand exhibition where thousands of people can admire and appreciate it. Your Google Developer account is like that exhibition space – it’s the platform where you can display your digital art (the app) to millions of people worldwide.
So, how does one create this account? Well, it’s as simple as preparing your favorite recipe.
Here are the steps:
A. First, go to the Google Play Console website, which is like the kitchen where you’ll prepare your dish.
B. Then, click on ‘Sign Up’, similar to how you would gather your ingredients. Here, you’ll need to use a Google account. If you don’t have one, it’s like running out of flour – you’ll have to go and get it, which means creating a new Google account.
C. Now, you agree to the Developer Agreement. This is a bit like following the recipe’s instructions – you have to agree to them to ensure your dish turns out right!
D. Next is the payment of a one-time $25 registration fee, a bit like purchasing a cooking tool you’ll need to prepare your recipe.
E. Lastly, you’ll complete your account details – your ‘Contact Information’ and ‘Merchant Profile’. Think of this as setting the table before serving your dish.
After you’ve finished these steps, you’ve got your Google Developer account ready to go – your exhibition space is set up and ready to showcase your app masterpiece to the world!
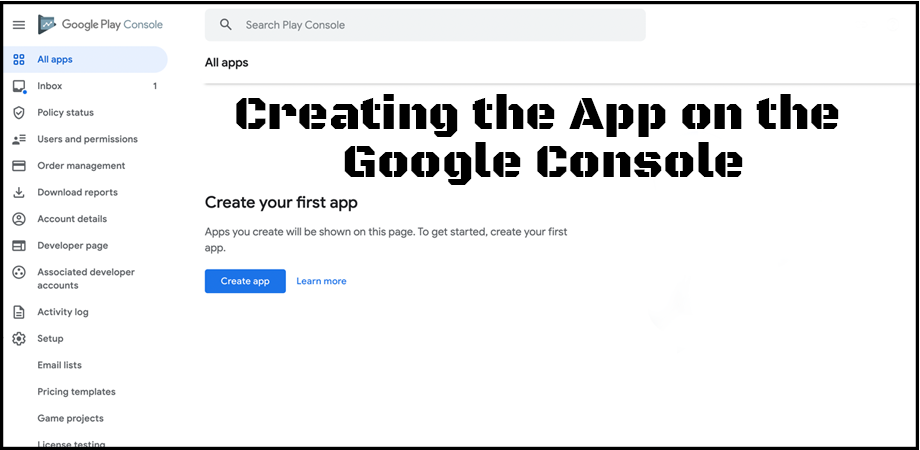
2. Creating the App on the Google Console
Imagine you’ve just completed the exciting process of app development and built the most incredible digital treehouse. It’s equipped with everything you’ve ever wanted – a secret door, a rope ladder, and even a cool telescope to stargaze at night. Now, it’s time to share this exciting hideaway with your friends. This is what it feels like when you’re ready to upload your app to the Google Play Console. The app you’ve built, much like your treehouse, is a result of your creativity and hard work, and now it’s time to invite others to see and appreciate it.
Google Play Console is like the special invitation card you send out to your friends. Creating your app on it is how you announce to the world about your exciting new treehouse (your app).
Here’s how to do it:
A. First, sign in to your Google Play Console, just like stepping into your post office to send out the invitations.
B. Now, click on ‘Create Application’, as if you’re picking out the perfect invitation card design. Here, you choose the language and write down the title of your app. It’s like writing down the name of your treehouse on the card.
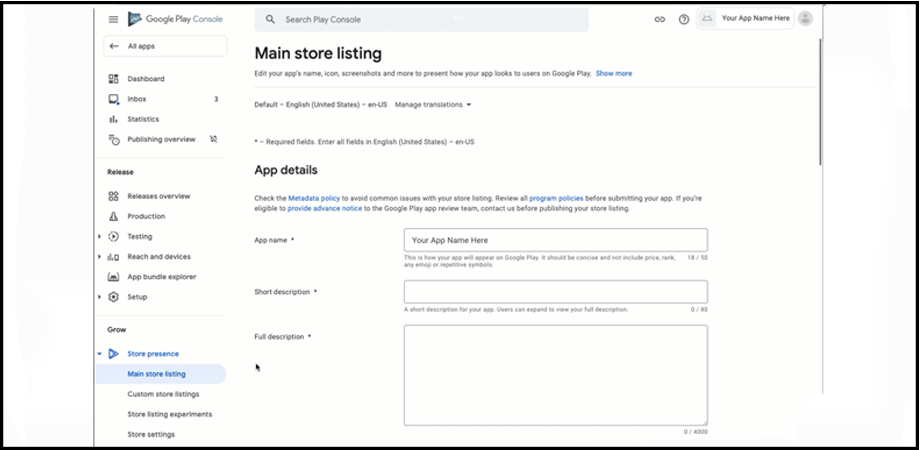
C. Then, fill out the ‘Product Details’: your app’s short and long descriptions, and screenshots. This is like telling your friends about all the fun things in your treehouse – the secret door, the rope ladder, and the telescope. You want them to be excited about it!
D. Set up the ‘Content Rating’. This is like telling your friends if the treehouse is suitable for them. A treehouse with a tricky rope ladder might not be suitable for very young friends, right?
E. Determine the ‘App Release’. This is deciding when to invite your friends over. Do you want them all to come at once, or do you want to invite them in small groups?
F. Finally, set up the ‘Pricing & Distribution’ and ‘Store Listing’, just like writing down your treehouse’s location and when it’s open for visits.
Once all these are done, congratulations! Your app, your digital treehouse, is now ready for the world to see and admire. Remember, just as every bolt and board in your treehouse was placed with intention, each detail you provide in the Google Play Console helps people understand and love your app. Now, take a deep breath, hit publish, and watch as your creation brings joy to others, one download at a time.
3. Store Listing
Imagine you’ve organized an exciting treasure hunt and your friends are eager to participate. You’ve carefully hidden clues and rewards, each more thrilling than the last. But how will your friends embark on this adventure if they don’t have a map? In the world of app publishing, Store Listing is that treasure map. It’s your way of guiding users to discover and appreciate all the cool features of your app—the treasures you’ve so thoughtfully incorporated.
So, what makes a compelling treasure map— or in our case, a Store Listing?
Let’s break it down:
A. Title: Just like the name of your treasure hunt, your app’s title is the first thing people will see. Make sure it’s catchy and gives a clue about what the app does. For example, if your app is a game where users can grow their virtual garden, a title like “Bloom Bliss: Your Pocket Garden” would be appealing.
B. Short Description: This is like a sneak peek of the thrilling adventure you’ve prepared. A quick line that excites users and prompts them to know more. For our imaginary gardening game, it could be “Turn your screen green, and let your virtual garden dream come true!”
C. Full Description: This is the main part of the treasure map—the path leading to the grand prize. Here, you can elaborate on what your app does, its features, and why users should download it. For instance, you could talk about different plants they can grow, rewards they can earn, and how the game can help them unwind.
D. Screenshots, Videos, and Graphics: These are like pictures of the treasure and the exciting spots along the hunt. A picture speaks a thousand words, so screenshots of your app in action or a quick video tour can significantly enhance your listing.
E. App Category: This is like telling your friends if the treasure hunt is in a park, a beach, or a castle—it sets the scene. Whether your app is a game, a fitness tool, or an educational resource, this will help users find it.
F. Contact Details: This is where you, the organizer of the treasure hunt, provide ways for participants to reach you if they have questions or need help. It’s a good practice to provide an email address where you can be reached.
Crafting your Store Listing is like setting up an adventure for your users. The goal is not just to get them to download the app, but to make sure they’re excited to open it again and again. And when you see those download numbers ticking up, it’s the same feeling as watching your friends’ faces light up as they embark on your treasure hunt!
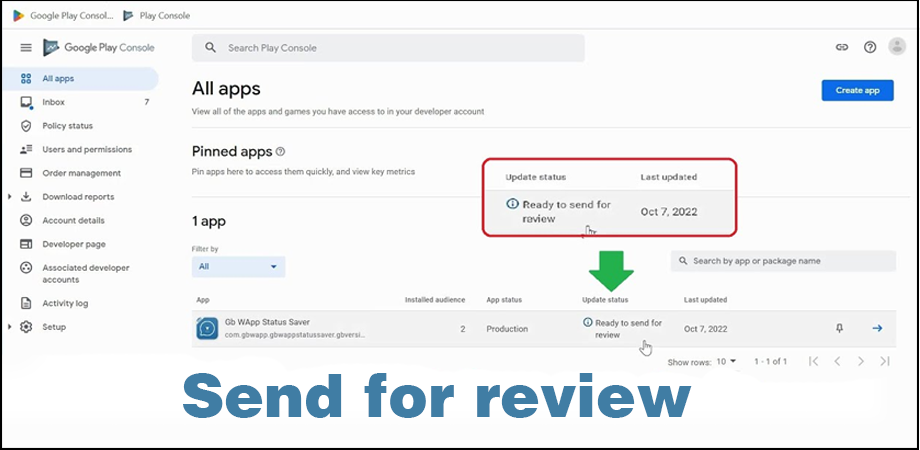
4. Upload APK and Send it for Review
Picture yourself as a brilliant magician who’s finally ready to reveal their dazzling new trick to the world. You’ve practiced it countless times in front of your mirror, ironed out all the kinks, and now the time has come to step onto the stage. Uploading the APK of your app and sending it for review is akin to that big moment under the spotlight.
An APK, which stands for Android Package Kit, is like the magic box that holds your trick. It contains all the elements of your app, like the design, features, and functionality, bundled up neatly. When you upload your APK to Google Play Console, it’s like revealing your magic box to the world, but the trick’s not done yet.
Here’s how it goes:
A. Upload the APK: On the Google Play Console, there’s an option to ‘Upload APK.’ That’s where you present your magic box. You’ll choose the file from your computer, and in a few moments, it’s up on the stage.
B. Set Up the Review Process: Now, it’s time to ask Google to inspect your magic trick. You’ll find this in the ‘App Releases’ section where you can select ‘Review.’ This is you saying, “Go ahead, Google. Check out my trick.”
C. Wait for the Review: Just like the gasps and whispers of an audience waiting for the outcome of a magic trick, there’s anticipation while Google reviews your app. It can take up to 7 days or more, so while it’s normal to feel a bit nervous, remember – even the greatest magicians had to wait for their applause.
D. Handle the Outcome: If Google finds that your app follows all the rules, congratulations! Your trick is a success, and your app is ready to be published. But if there are any issues, don’t worry. Google will give you feedback, and you can fix them. Just like a magician who might need to tweak their trick before the grand reveal.
And there you have it! You’ve completed the big moment – the APK upload and review. It’s a pivotal part of your journey as an app developer, the moment when your hard work meets the world’s stage. So take a deep breath, click ‘Upload’, and remember – every great show has a thrilling climax, and this could be yours!
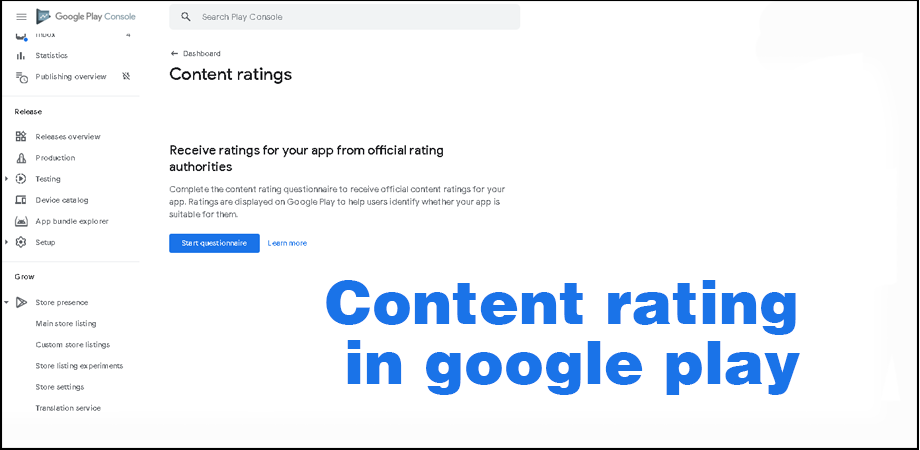
5. Content Rating
Imagine you’re organizing a movie night for your friends. You’ve got the popcorn ready and the room set up just right. But when you choose the movie, you have to consider who’s watching. A spooky horror film might be great for your thrill-seeking friends, but not for those who prefer a light-hearted comedy or a fun animation. Similarly, when you’re publishing your app on Google Play Store, setting the right content rating is essential.
The content rating is like a movie genre label – it helps people understand if your app is the right ‘fit’ for them. It informs users about the suitable age group and any sensitive content present in your app. In the same way, you wouldn’t want your younger sibling to accidentally watch a scary movie; you wouldn’t want kids stumbling upon an app that’s not age-appropriate.
Here’s how you can set the content rating for your app:
A. Questionnaire: Google Play Console will present you with a questionnaire, much like a movie survey asking about the film’s elements. It’s important to answer these questions accurately, taking into account all the features and content of your app. It’s like making sure you remember all the scenes in the movie before deciding who it’s suitable for.
B. Review and Apply: Once you’ve completed the questionnaire, Google will suggest a rating. It’s like a movie rating popping up based on your survey answers. You’ll then apply this rating to your app.
C. Wait for Approval: Like waiting for your friends’ thumbs-up on the movie choice, Google will review your rating application. If everything checks out, your rating will be approved.
D. Make Necessary Adjustments: If Google suggests that your app’s content is not suitable for a particular age group, you might need to make adjustments. It’s like editing the scary scenes out of a movie if you want it to be kid-friendly.
Assigning the right content rating for your app is an essential step in the publishing process. It ensures that your app reaches the right audience – those who will enjoy and appreciate it the most. So, just like carefully picking the right movie for movie night, take your time to understand and set your app’s content rating. It might seem like a small detail, but it can significantly impact how well your app is received and who ends up using it!
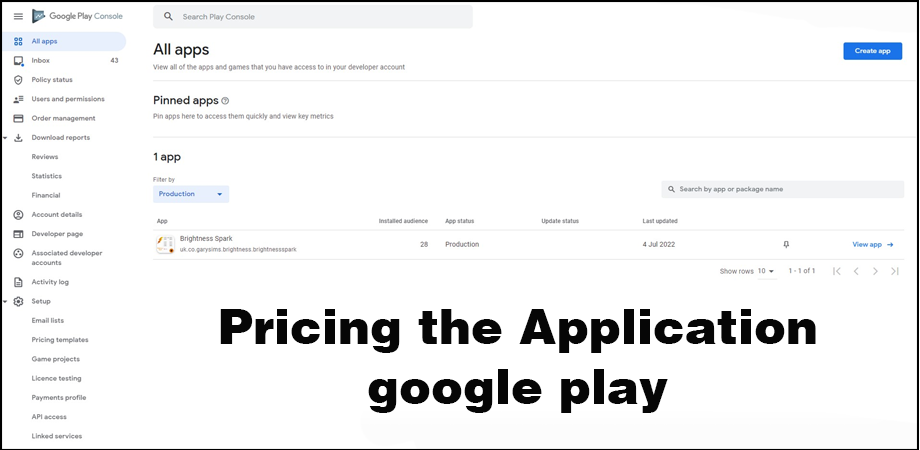
6. Pricing the Application
Picture this: you’ve spent weeks, maybe even months, building a spectacular sandcastle on the beach. It’s intricate, with high walls, elegant towers, and even a tiny moat around it. Now, imagine if you could charge a small fee for people to marvel at your creation, the money going towards maintaining the castle or perhaps building more impressive ones in the future. Deciding on a price for this viewing experience is much like pricing your application on the Google Play Store.
When you price your application, you’re essentially putting a value on your digital sandcastle. You’ve invested time and effort into creating it, and if people find it valuable, they might be willing to pay for it. But setting this price isn’t as simple as pulling a random number out of a hat.
Here’s how you might go about it:
A. Research: Firstly, you need to understand your audience. Who will be interested in your sandcastle, or in this case, your app? What are similar apps priced at? Like finding out how much people typically pay to see sandcastles, understanding the market can help you set a fair price.
B. Value Determination: Next, consider the value your app provides. If your sandcastle lights up at night or if your app offers unique features that others don’t, you might charge a little more. But remember, the price should still reflect what your audience can afford and is willing to pay.
C. Choose the Pricing: After considering these factors, you can set a price. On the Google Play Console, you’d go to the ‘Pricing & Distribution’ section and enter your chosen price.
D. In-App Purchases or Ads: Sometimes, you might want to offer your app for free but have other ways to generate income. It’s like letting everyone see your sandcastle for free, but if they want a guided tour or a picture with it, they’d have to pay a small fee. In the app world, these are like in-app purchases or ads.
E. Switching Between Free and Paid: Google Play allows you to change your app from paid to free. However, once your app is free, you cannot make it paid again. This is like allowing free entry to your sandcastle once, but if you decide to charge again later, those who got in for free should always have free entry.
Pricing your application is a strategic process, requiring you to balance your cost of making your app and what users are willing to pay. It’s about recognizing the value of your creation and communicating that to your users. Just as every grain of sand contributes to the sandcastle, every feature of your app adds to its value. And with the right price, your app can be appreciated by many, all while supporting your passion for creating more digital ‘sandcastles’!
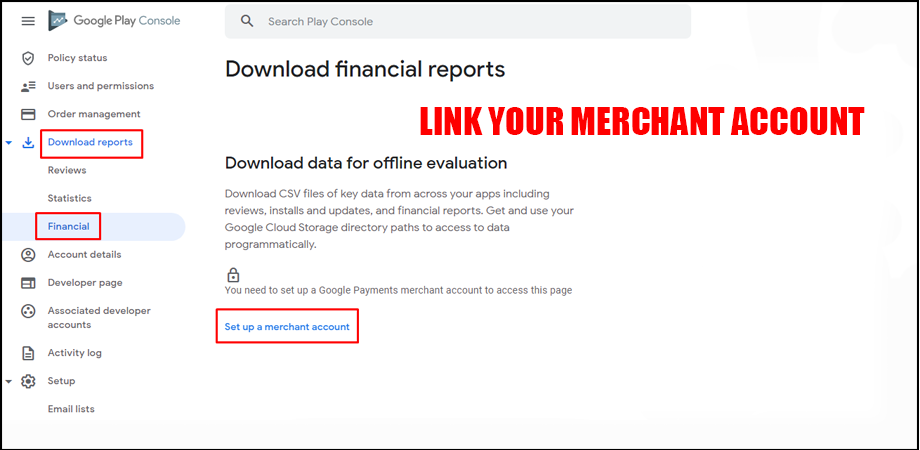
7. Link Your Merchant Account
Picture this: You’ve set up a lemonade stand. It’s a hot day, and people passing by are thrilled to see your stand. They enjoy your refreshing lemonade and are ready to pay. But here’s the catch – you’ve got no cash box to collect the money. This is where linking your merchant account while publishing an app on the Google Play Store comes into the picture.
Linking a merchant account is like setting up your cash box. It’s where all the earnings from your app will be collected, be it from users buying your app, making in-app purchases, or generating ad revenue.
Here’s how you do it:
A. Create a Payments Profile: First, you’ll need a Google Payments Profile, which is like your personal identifier on the Google payment platform. It holds essential details like your name, address, and bank account information. This profile is crucial as it’s where all your transactions will be recorded – kind of like keeping a tally of all the lemonades you’ve sold.
B. Set Up a Merchant Account: Once your Payments Profile is ready, you can set up a merchant account on Google Play Console. It’s similar to setting up your lemonade stand and displaying a sign saying “Lemonade for Sale”. This account is where you’ll manage all your app sales and view your financial reports – a dedicated spot to oversee your business.
C. Link Your Merchant Account: Now, it’s time to connect your cash box to your lemonade stand, or in other words, link your merchant account to your app. In the Google Play Console, you’ll find the option to do this in the ‘Monetization setup’ section under ‘Monetize’. Once you’ve linked the account, you’re all set to start receiving payments from your app.
Just like setting up a cash box makes it possible for you to earn from your lemonade stand, linking a merchant account allows you to earn from your app. It’s an exciting step – you’ve built something people value, and now you’re ready to see the fruits of your labor. But remember, just like the joy of making lemonade isn’t just in the money earned but also in the smiles of people who enjoy it, building an app isn’t just about earning. It’s about the joy of creating something that people appreciate and find useful, making all your hard work worth it!
8. App Name and Icon
Let’s imagine that you’ve written a fantastic book. It has a gripping storyline, interesting characters, and everything else that makes for a great read. But what would you call this book? And what image would you choose for the cover? This is quite like naming your app and choosing its icon when publishing on the Google Play Store.
Your app’s name and icon are like the title and cover of your book. They’re the first things people notice when browsing the app store, just like a book’s title and cover can catch a reader’s eye in a bookstore. They create the first impression and can spark curiosity, excitement, and interest.
Here’s how you go about it:
A. App Name: Just like you’d want your book title to be catchy and intriguing, your app’s name should also be attractive and relevant to what your app does. For instance, if your app is a weather forecasting app, you might choose a name like ‘Sunshine’ or ‘Weather Wizard’. It’s important to remember that the app name should not exceed 50 characters, as per Google Play Store guidelines.
B. App Icon: Choosing an app icon is like picking a book cover. It needs to be visually appealing and give an idea of what your app is about. An icon with a sun and a cloud could be an excellent fit for your weather app. The icon needs to be a 512 x 512 pixels image in PNG format.
Creating your app’s name and icon is a mix of creativity and strategy. You want it to stand out in the crowd, much like your book in a bookstore, but it also needs to reflect your app’s essence. Just like the thrill of seeing your book with its name and cover for the first time, seeing your app with its name and icon is equally exciting. It gives identity to your hard work and creativity and is the first step in introducing your app to the world. So, be creative, be strategic, and most importantly, have fun in the process!
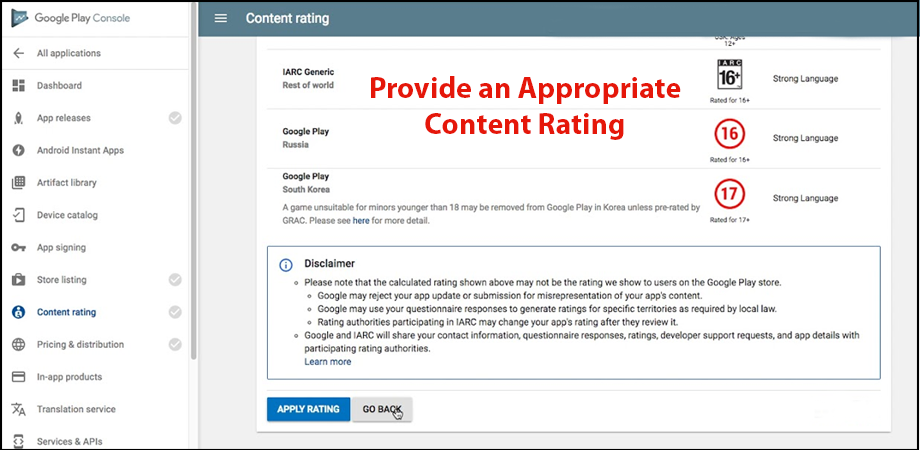
9. Provide an Appropriate Content Rating
Imagine you’re the host of a movie night at your house. You’ve invited friends of all ages – some are your age, some are much older, and some are your little siblings and their friends. Would you pick the same movie for everyone? Probably not. The movie that’s appropriate for your friends might not be suitable for your little siblings. This is much like providing an appropriate content rating for your app on the Google Play Store.
A content rating in the app world is like a movie’s age rating. It guides users (and their parents) to determine if an app is suitable for them. Whether an app is like a G-rated movie for everyone or a PG-13 one for slightly older kids depends on its content.
Here’s how you determine this:
A. Analyze Your App: The first step is to understand your app thoroughly. Is it an educational app suitable for all ages, or does it contain content that’s only appropriate for adults? This is like figuring out whether your movie is a fun animated film or a thrilling action movie.
B. Fill Out the Content Rating Questionnaire: Google Play Store provides a content rating questionnaire that helps you rate your app. It asks about things like the presence of violence, sensitive themes, or user-generated content in your app. It’s like having a list of questions to help you decide which movie is suitable for your movie night attendees.
C. Review and Apply the Rating: Once you’ve filled out the questionnaire, Google Play Store will provide a content rating for your app. This rating will be visible to users when they view your app on the Play Store. This is like deciding that the animated film is suitable for your little siblings, while the thrilling action movie is for your older friends.
Providing an appropriate content rating is a responsible and critical step in publishing an app. It’s about ensuring the right audience finds your app and has a positive experience using it. Just like picking the right movie ensures everyone has a fun movie night, the right content rating ensures that users (and their parents) can trust your app and enjoy using it. It’s like being a thoughtful host but for your app!
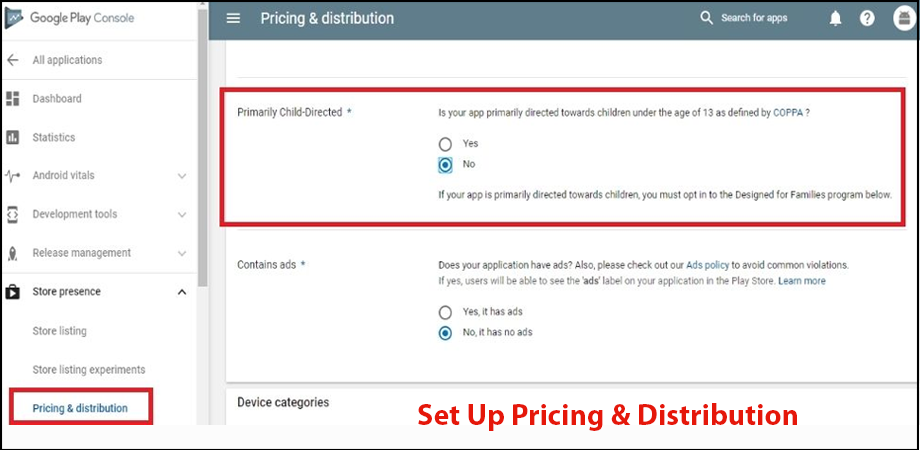
10. Set Up Pricing & Distribution
Imagine you’re planning a big garage sale. You’ve got a variety of items – from old comic books to a bicycle you no longer use. Now, you need to set prices for each item and decide who can come to your sale. Is it just your neighbors or people from other towns too? This process is quite similar to setting up pricing and distribution for your app on the Google Play Store.
Setting up pricing is like labeling your garage sale items. You need to decide whether your app will be free or paid. If it’s paid, how much should it cost? Should there be in-app purchases or subscriptions? These decisions should consider the value your app provides, much like how the price for your barely-used bicycle would be higher than the old comic books.
Next is distribution. Just like deciding who can attend your garage sale, you need to decide where your app will be available. Can users worldwide download it, or only those in specific countries? This is important because the app regulations, language, and preferences can vary from one region to another.
Here’s how to set it up:
A. Decide on Pricing: In the Google Play Console, you’ll find a section called ‘Pricing & Distribution’. Here, you can set your app as free or paid. Remember, once set as free, it can’t be changed to paid later. For a paid app, you decide the price. And just like how you might offer a special deal on your comic books, you can also set up in-app purchases or subscriptions in your app.
B. Set Up Distribution: In the same ‘Pricing & Distribution’ section, you can choose the countries where your app will be available. It’s like putting up signs for your garage sale – the more places you put up the signs, the more people can come to your sale.
Setting up pricing and distribution is an exciting phase in publishing an app. It’s when you decide the value of your app and who can benefit from it. And just like the joy of seeing people appreciate the items at your garage sale, knowing that your app is out there, available to users, and providing value, brings immense satisfaction. It’s the culmination of all your hard work and creativity – your very own digital garage sale!
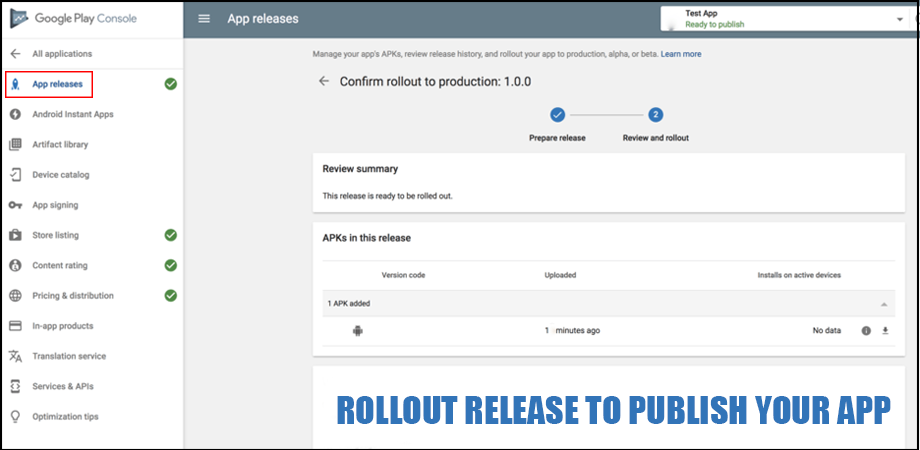
11. Rollout Release to Publish Your App
Let’s imagine you’ve planned an elaborate surprise party for a friend. You’ve done everything – invited the guests, decorated the venue, arranged for food and music – and now, it’s time to turn off the lights and wait for the birthday boy/girl to arrive. This final, thrilling step is similar to rolling out the release to publish your app on the Google Play Store.
After all the careful planning, creating, and preparing, it’s time to hit the ‘Publish’ button and make your app live. But just like you wouldn’t want all the guests to shout ‘surprise’ before your friend steps into the room, it might be a good idea not to release your app to everyone all at once.
Google Play Store allows you to roll out your app release gradually. It’s like planning smaller surprise parties before the big ones. This helps you to gauge the reaction of a small group of users, fix any unforeseen issues, and then extend the release to more users.
Here’s how it works:
A. Prepare for Release: In the Google Play Console, you need to prepare a release. This is like double-checking the party arrangements before the guests arrive. It involves reviewing and finalizing all the details you’ve set up earlier – from app name, icon, and pricing to distribution and content rating.
B. Rollout Release Gradually: Next, you can choose to roll out the release to a percentage of users. Maybe start with 10% or 20%, like inviting a few guests first to test the surprise. This allows you to monitor the app’s performance, gather feedback, and ensure that everything works perfectly.
C. Increase the Rollout or Full Release: Based on the response and performance, you can increase the rollout percentage or go for a full release. This is like seeing the first few surprise parties go well and then organizing the big one.
Rolling out the release to publish your app is a moment of excitement, anticipation, and satisfaction. Just like the joy when your friend walks into the surprise party, seeing your app live on the Play Store is an incredibly rewarding moment. It’s the culmination of all your hard work, creativity, and careful planning – the final ‘Surprise!’ in the journey of publishing your app.
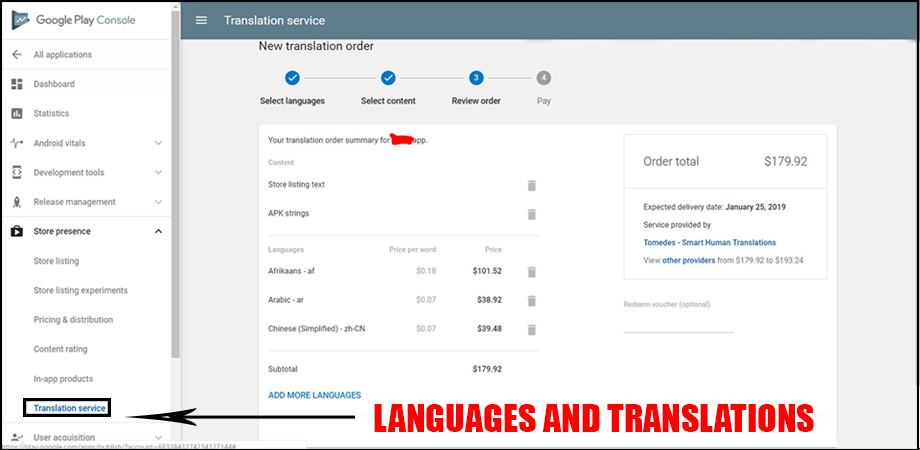
12. Languages and Translations
Picture this: You’ve just baked the best chocolate cake ever. It’s delicious, and you want to share the recipe with the world. But there’s a catch. Not everyone speaks your language. To share the recipe with more people, you need to translate it into other languages. This scenario is similar to considering languages and translations when publishing an app on the Google Play Store.
In the digital world, your app is like a chocolate cake recipe. It’s something valuable that you want to share. But not all potential users speak or understand the same language. By translating your app’s content and listing it in other languages, you’re opening the door for more people to access and appreciate your app.
Let’s break it down:
A. Identify Your Audience: The first step is to know who your users are and what languages they speak. This is like knowing that some of the friends you want to share the recipe with speak Spanish, some speak French, and others speak Italian.
B. Translate Your App and Store Listing: Now, you take your app (the recipe) and translate all the relevant information into the selected languages. This is done within the Google Play Console. Just like translating the recipe, this could include the app’s name, description, and even the content within the app itself.
C. Apply the Translations: Once translated, these details can be applied to the appropriate regional store listings. This way, when a user in Spain (for example) looks up your app, they will see the store listing in Spanish. It’s like giving your Spanish-speaking friend the recipe written in Spanish.
By considering languages and translations, you’re not just spreading your app to more users; you’re also respecting cultural diversity and bridging language barriers. It’s the digital equivalent of sharing your love for baking with the world, one chocolate cake recipe at a time. And who knows, maybe your app, like your chocolate cake, could become someone’s favorite in a country far, far away.
13. Setup up Contact details
Let’s imagine you’re at a park flying your newly crafted, colorful kite. It soars high and catches the attention of everyone around. They’re mesmerized by its design and the skill with which you’re maneuvering it. Some of them might want to learn how to make such a beautiful kite or how to fly it that high. They would need a way to reach out to you, wouldn’t they? This is quite similar to setting up contact details when publishing an app on the Google Play Store.
Your app is like your kite, soaring high in the digital sky of the Play Store. People who download it might have questions, need help, or want to give suggestions on how it could be better. That’s why Google requires you to provide a valid way for them to contact you.
Here’s how you can do this:
A. Choose a Contact Method: You need to decide the best way for users to reach you. This could be an email address, a website, or a phone number. Choose a method that you are comfortable with and can manage efficiently.
B. Enter Your Contact Details: In the Google Play Console, you’ll find a place to enter your contact details. It’s like writing your contact information on the tail of your kite. Anyone who needs to reach you can find it there.
C. Ensure it’s Valid and Active: Make sure that the contact information is accurate and active. There’s nothing more frustrating for a user than trying to reach out for help only to find that the email bounces back or the website doesn’t exist.
By providing a way for users to reach you, you’re showing them that you care about their experience and value their feedback. It creates a sense of trust and openness, much like making new friends at the park who are interested in your kite.
Remember, your app’s journey doesn’t end when it goes live on the Play Store. It’s just like your kite – to keep it soaring, you need to pay attention to the winds, adjust the string from time to time, and sometimes, even fix a tear or two. Setting up contact details is your way of staying connected with your users, ensuring your app keeps flying high.
Conclusion:
Publishing an app on the Google Play Store is a systematic journey. It starts with setting up a developer account, designing the app in the Google Console, and crafting an attractive store listing. The app’s readiness is tested by uploading the APK for review. An appropriate content rating is provided, the app is priced, and your merchant account is linked for revenue collection. The app’s identity is defined through its name and icon, and language options ensure it can reach a global audience. You provide contact details for user support, and finally, roll out the release for users worldwide to enjoy. This intricate process is what transforms your creative idea into a reality on the Google Play Store.
Experiencing roadblocks on your path to app publication? Our team at [Your Company] is here to simplify the process. Reach out to us now.
